DIY Built-In Shelves
I made built-in cabinets and shelves in my living room in four days and for about $2,000.
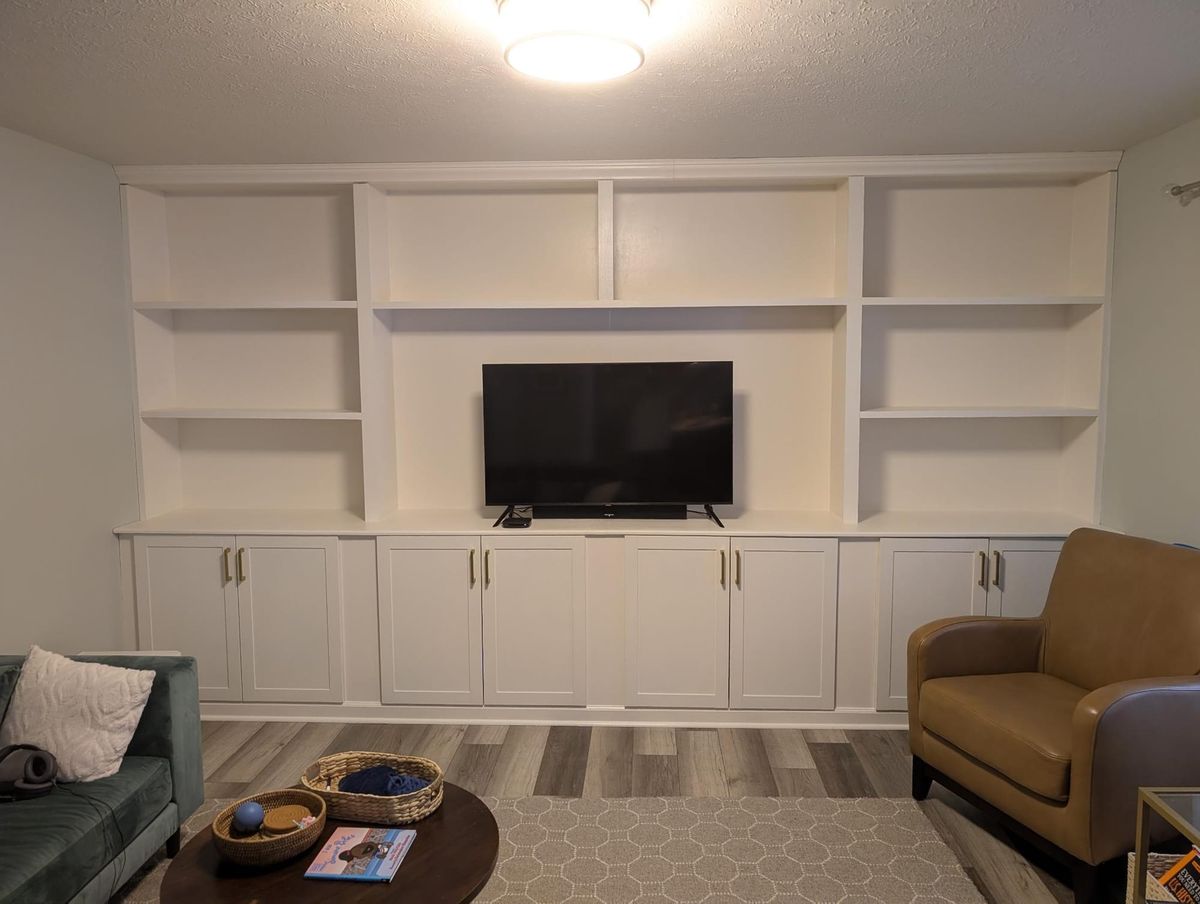
I love built-ins and Crystal and I have been talking about putting some in the living room for a while. Since the pergola project went so well and I already had most of the tools I'd need, we decided to pull the trigger on it.
Planning
The project took a few weeks to plan. Fortunately, draw.io has the ability to create diagrams using real-world dimensions like inches and feet, so it was super nice to effectively build the entire project virtually beforehand.
I decided to go with prefabricated cabinets because literally everyone says that building custom cabinetry suuuuuuucks, and I didn't want to take on that headache for this project.
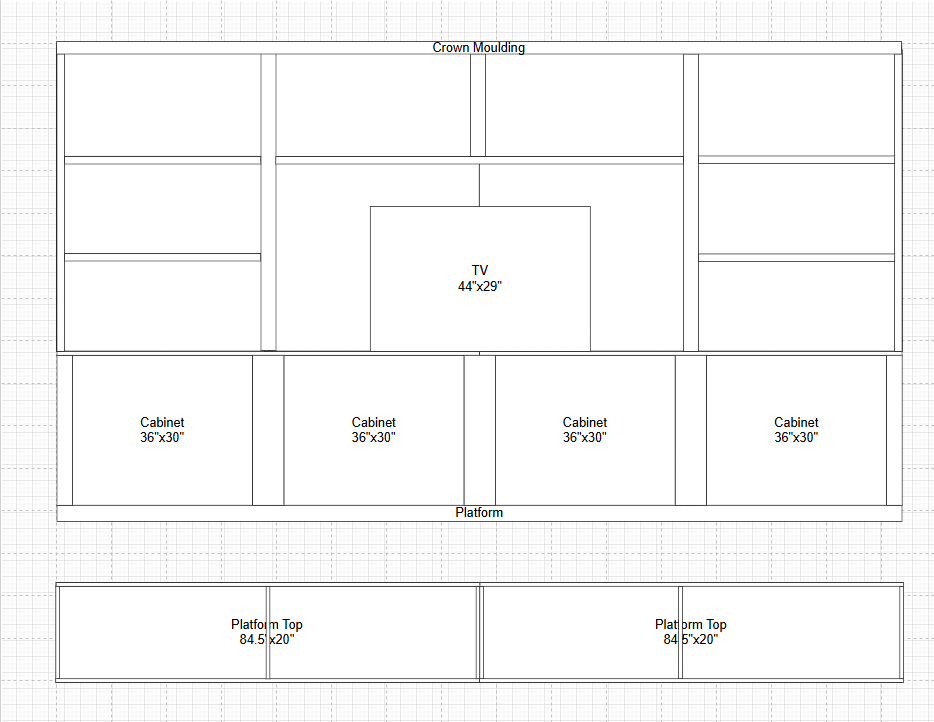
From the digital twin, I was able to itemize all the pieces I would need to complete the project.
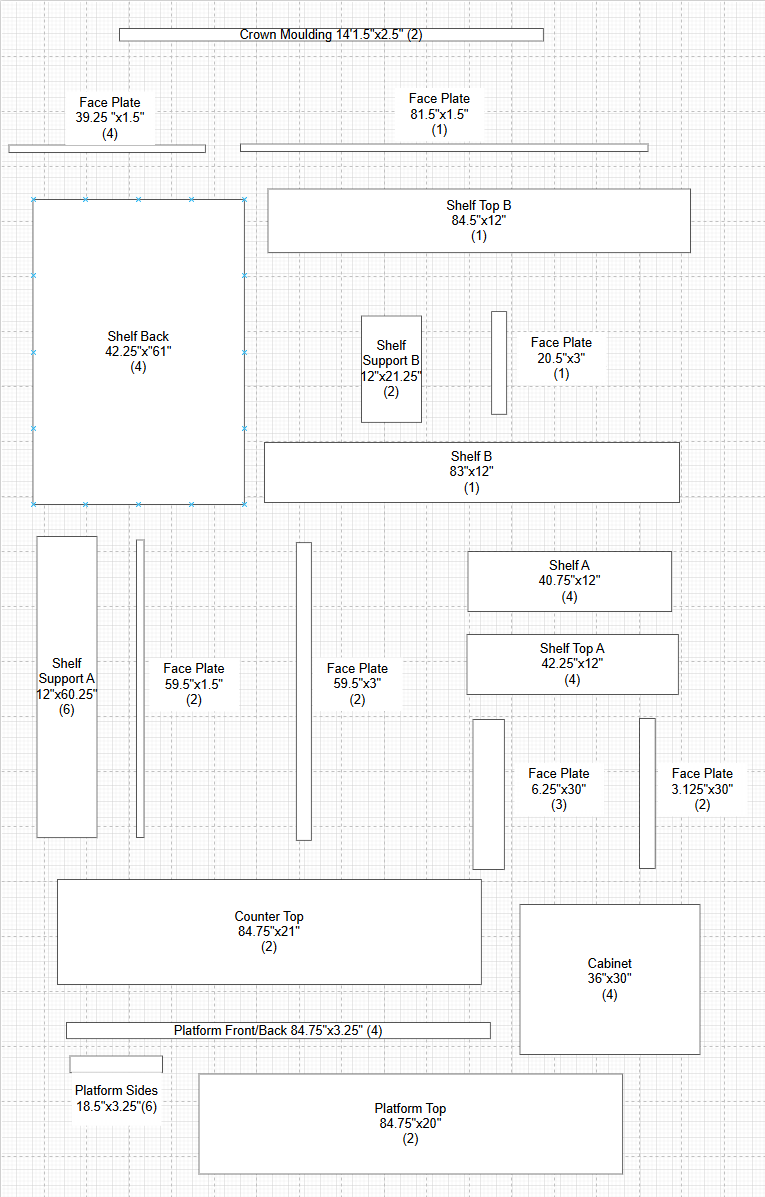
Then I could lay the pieces out on 8'x4' sheets of plywood and Poplar boards to make sure I ordered the correct amount of raw material and plan my cuts.
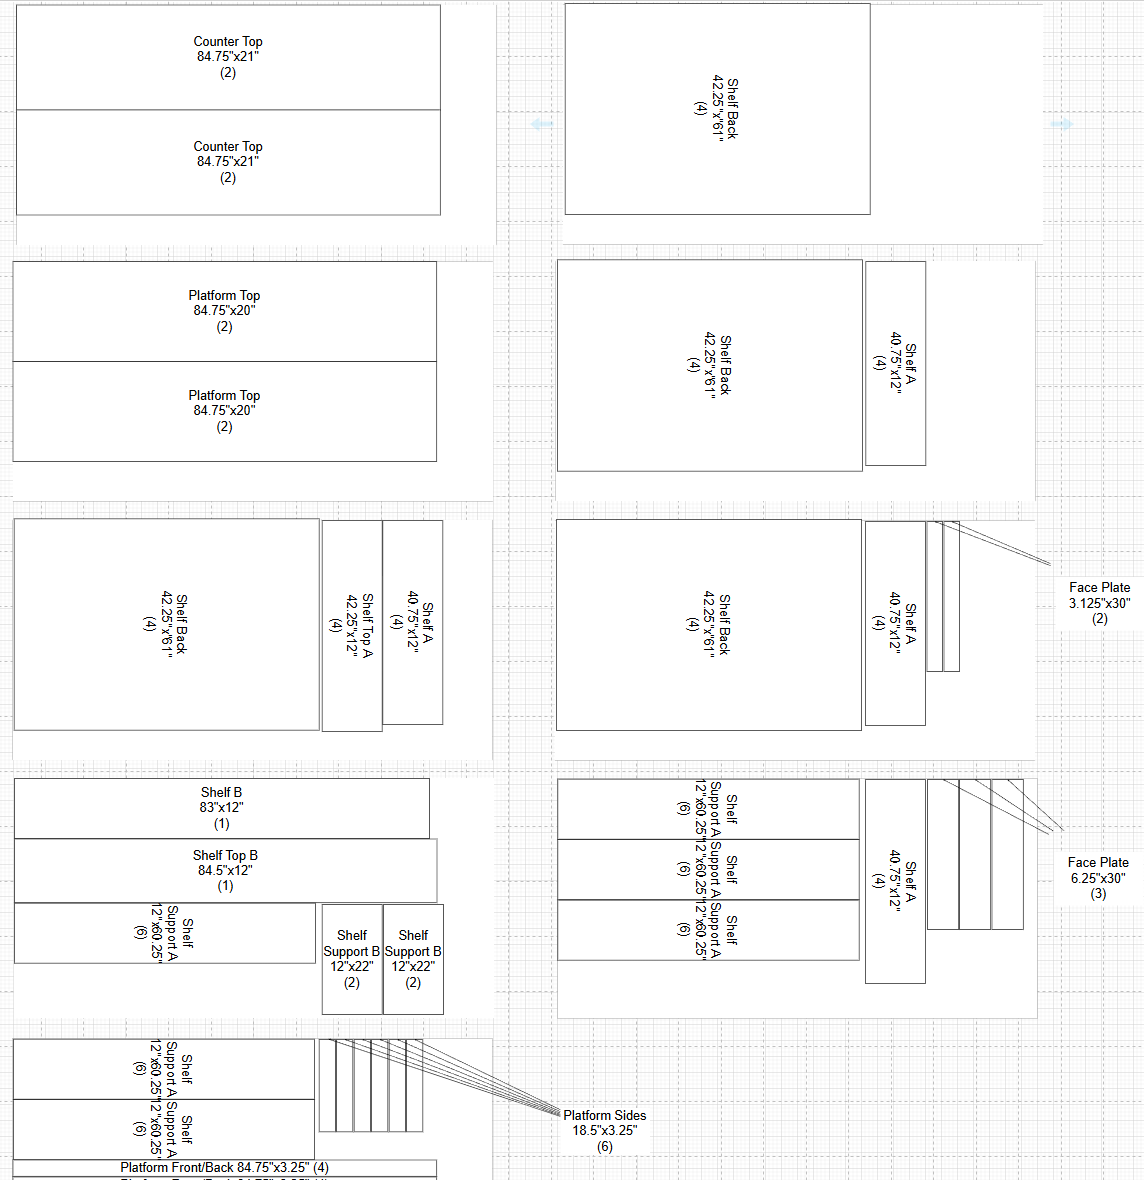
Below are the full plans for download.
Materials
As usual, Lowe's delivered all of the materials in less than a week and dropped them in my garage.
- 9x McCorry Corry PRO-Panel 3/4-in x 4-ft x 8-ft Sanded Plywood
- 6x ReliaBilt 1-in x 3-in x 6-ft Unfinished FAS Better S4S Poplar Common Hardwood Board
- 1x ReliaBilt 1-in x 3-in x 8-ft Unfinished FAS Better S4S Poplar Common Hardwood Board
- 2x ReliaBilt 9/16-in x 3-5/8-in x 8-ft Pine Primed L 49 Crown Moulding
- 2x ReliaBilt 9/16-in x 3-1/4-in x 8-ft Colonial Primed Finger Jointed Pine 623 Baseboard Moulding
- 2x ReliaBilt 11/16-in x 11/16-in x 8-ft Colonial Primed Finger-Joint Pine 106 Quarter Round Moulding
- 4x Diamond NOW Arcadia 36-in x 30-in x 12-in White Wall Fully Assembled Cabinet Recessed Panel Shaker
- 1x Madison Mill 0.25-in x 1.25-in Oak Dowel Pin (26-Pack)
- 1x Metabo HPT 1-1/4-in 18-Gauge Straight Electro-Galvanized Collated Brad Nails (1000 Per Box)
- 1x Grip-Rite #8 x 1-1/4-in Yellow Zinc Interior Wood Screws (184 Per Box)
- 2x Titebond III Ultimate Wood Adhesive
- 5x DAP ALEX Fast Dry 5.5-oz Paint and Trim White Paintable Latex Caulk
- 2x Sherwin-Williams Ovation Plus Semi-Gloss Base Tintable Interior Paint (1 Gallon)
- 8x Origin 21 Indio 3-3/4-in Center to Center Brushed Gold Rectangular Bar Drawer Pull
Total Cost: Approximately $2,000
Tools
I already had most of these tools from the pergola project. I just had to fill in a few new gaps in my repertoire, specifically a brad nailer and a router. This is the second time I needed a table saw, so I think I'll just buy one the next time I need it. For this project, I borrowed one from Crystal's father since I was already spending a few hundred dollars on additional tools.
- DeWalt 20V MAX XR Cordless Circular Saw
- Hitachi 10" Table Saw (Borrowed)
- DeWalt 20V MAX XR Cordless Router
- DeWalt 20V MAX XR Cordless Orbital Sander
- DeWalt 20V MAX XR Cordless Hammer Drill
- DeWalt 20V MAX XR Cordless Impact Driver
- DeWalt Elite Series Impact Driver and Drill Bit Set
- DeWalt 20V MAX XR Cordless 18-Gauge Brad Nailer
- DeWalt 20V MAX XR Cordless 2-Gallon Wet/Dry Shop Vacuum
- Pony 27-in x 34.6-in Plastic/Steel Saw Horse (2-Pack)
- Franklin Sensors X700 1-in Scan Depth Metal and Wood Stud Finder
- Bosch 60-ft Green Self-Leveling Cross-Line Laser Level
- 7-in Swanson Speed Square
- Craftsman 25-ft Tape Measure
- Project Source Caulk Finishing Tools
- Purdy XL 2-in Reusable Angle Multipurpose Paint Brush
- Project Source 9-in Metal Standard Paint Roller Frame
- Purdy 9-in x 3/8-in Nap WhiteDove Standard Woven Acrylic Fiber Paint Roller Cover (3-Pack)
- Project Source Metal 11-in Paint Tray
Assembly
Day 1
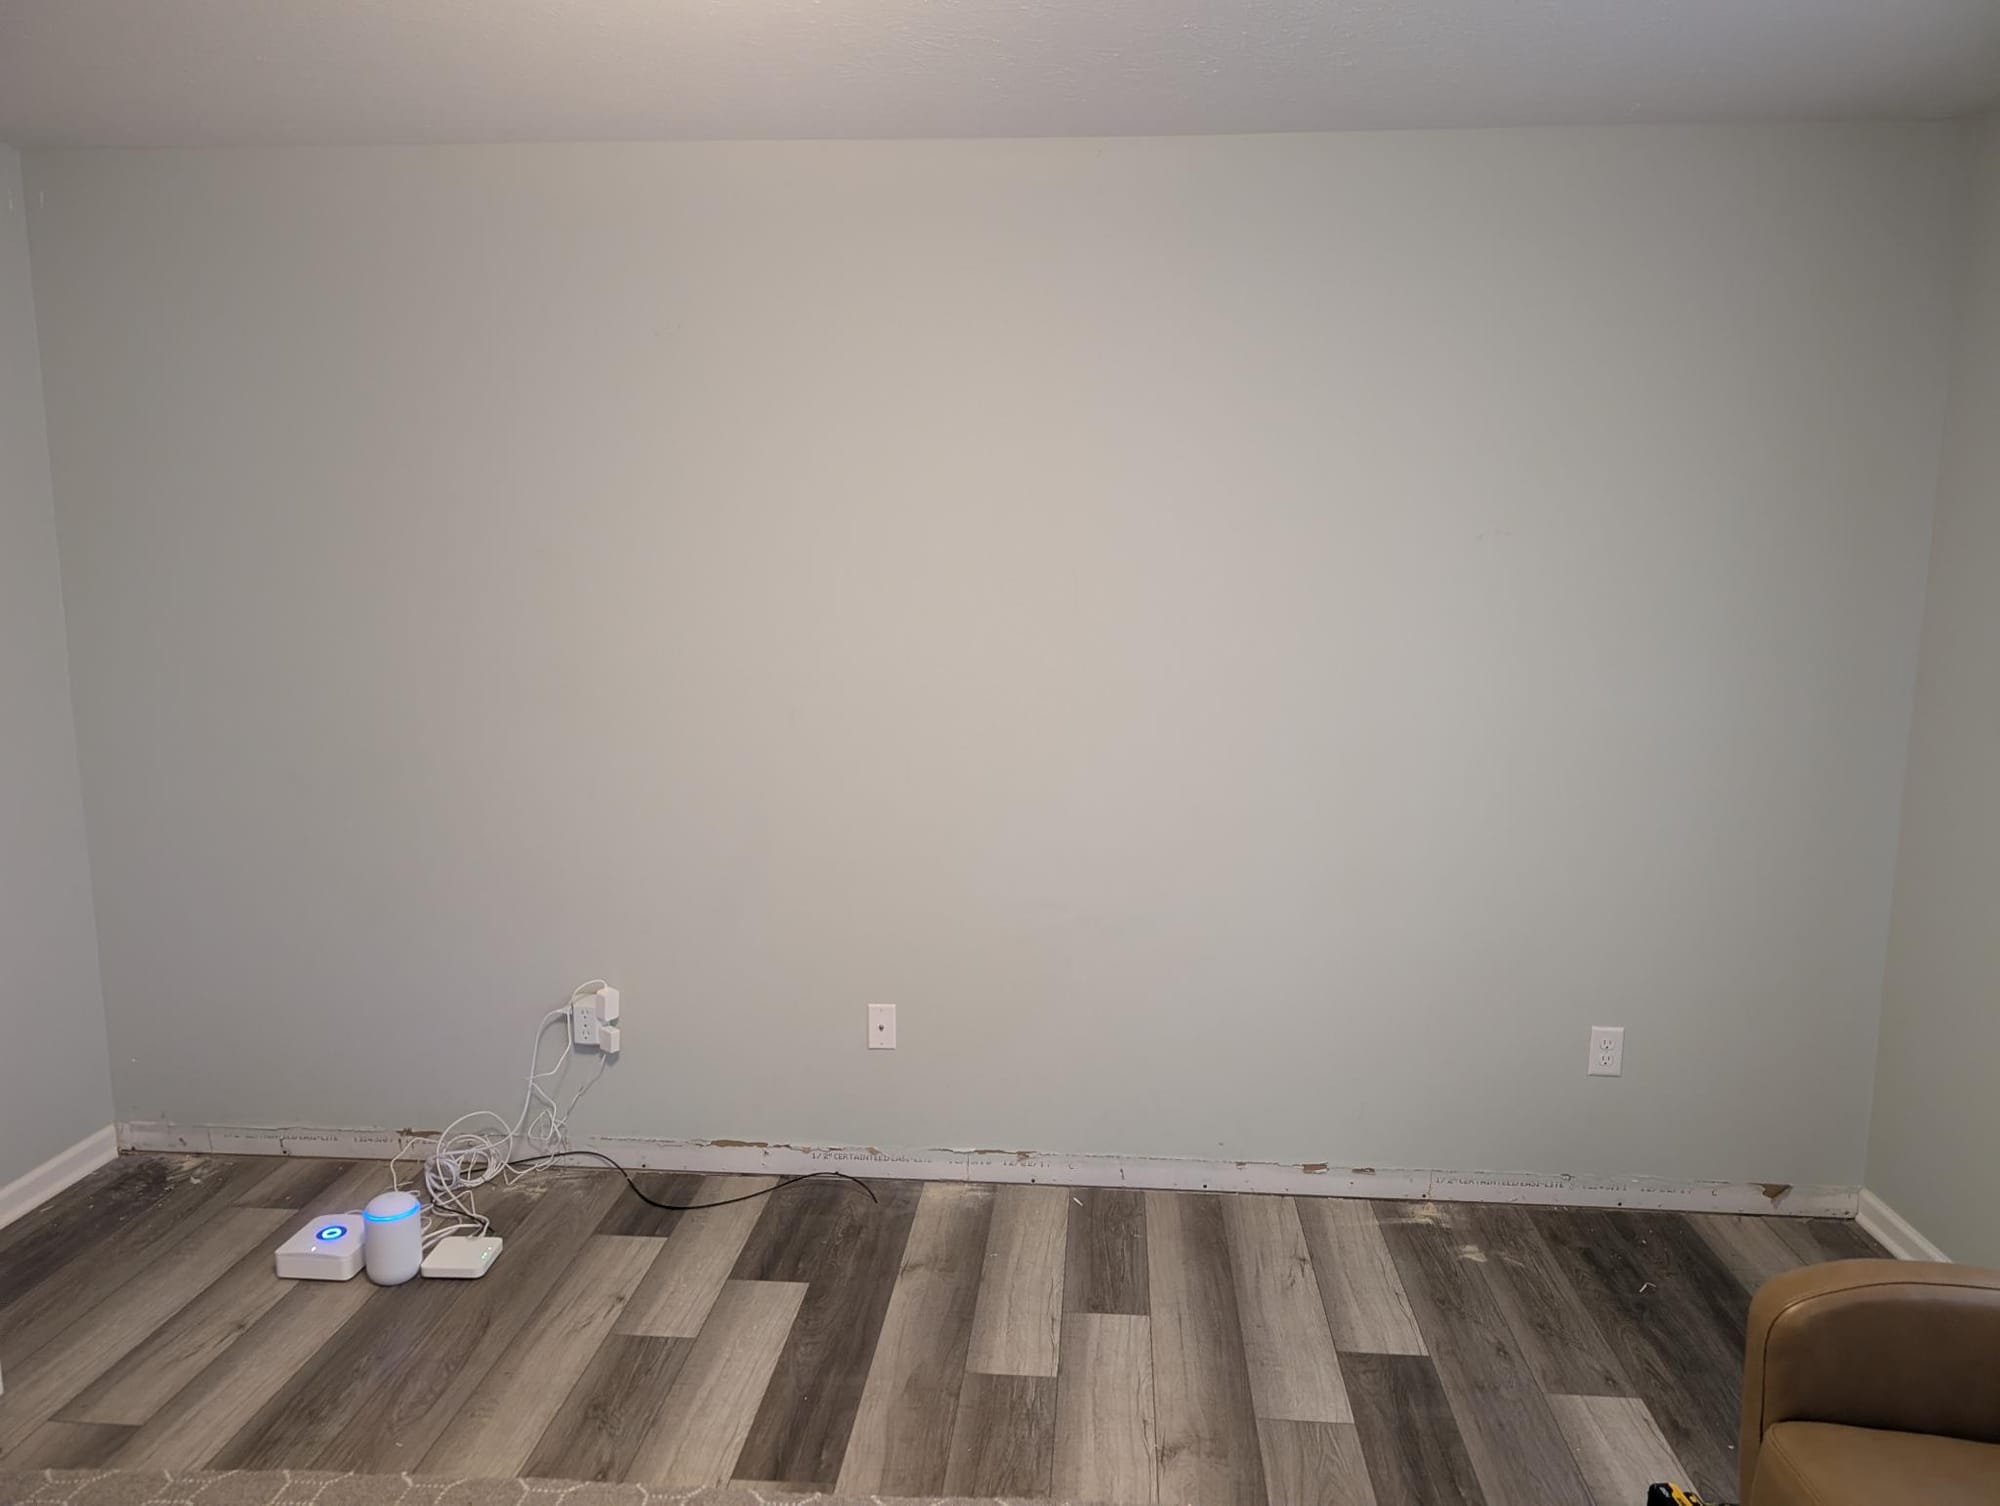
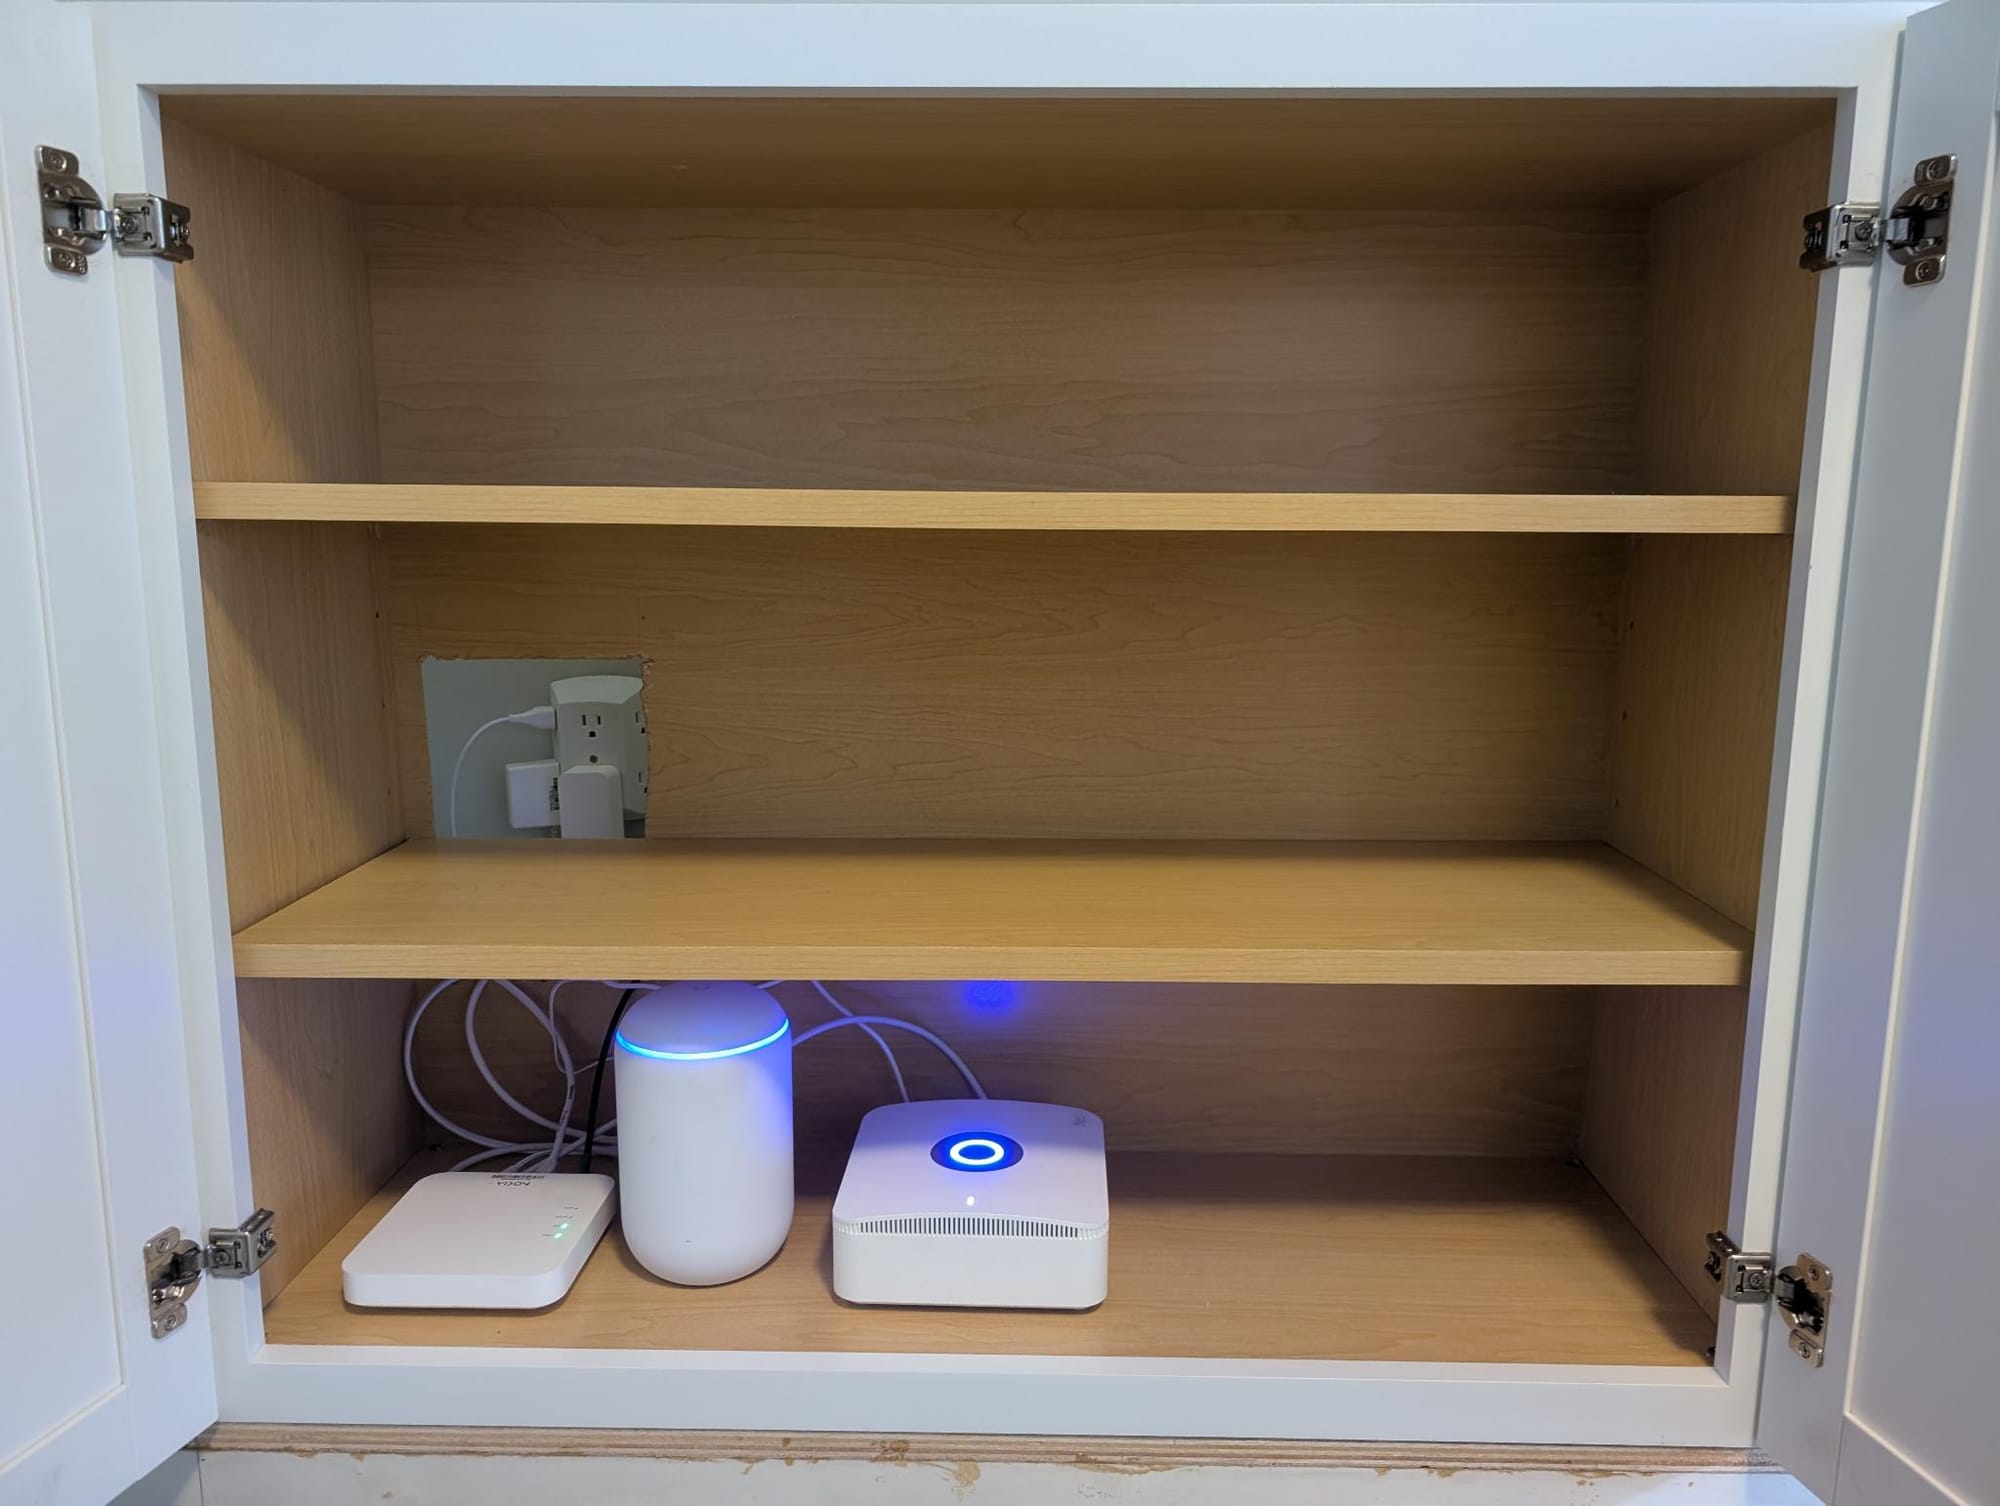
First thing to do was to clear the job site. We had a TV stand, some floor lamps, and wall decorations in this area. They all had to get moved out of the way. I also had to pull off the baseboard molding so the built-in can be flush with the wall. Of course, this is where the Greenlight Fiber Network comes into the house, and I couldn't ask Crystal and Lily to live for several days without Internet (I'm not a monster), so I had to work around it.
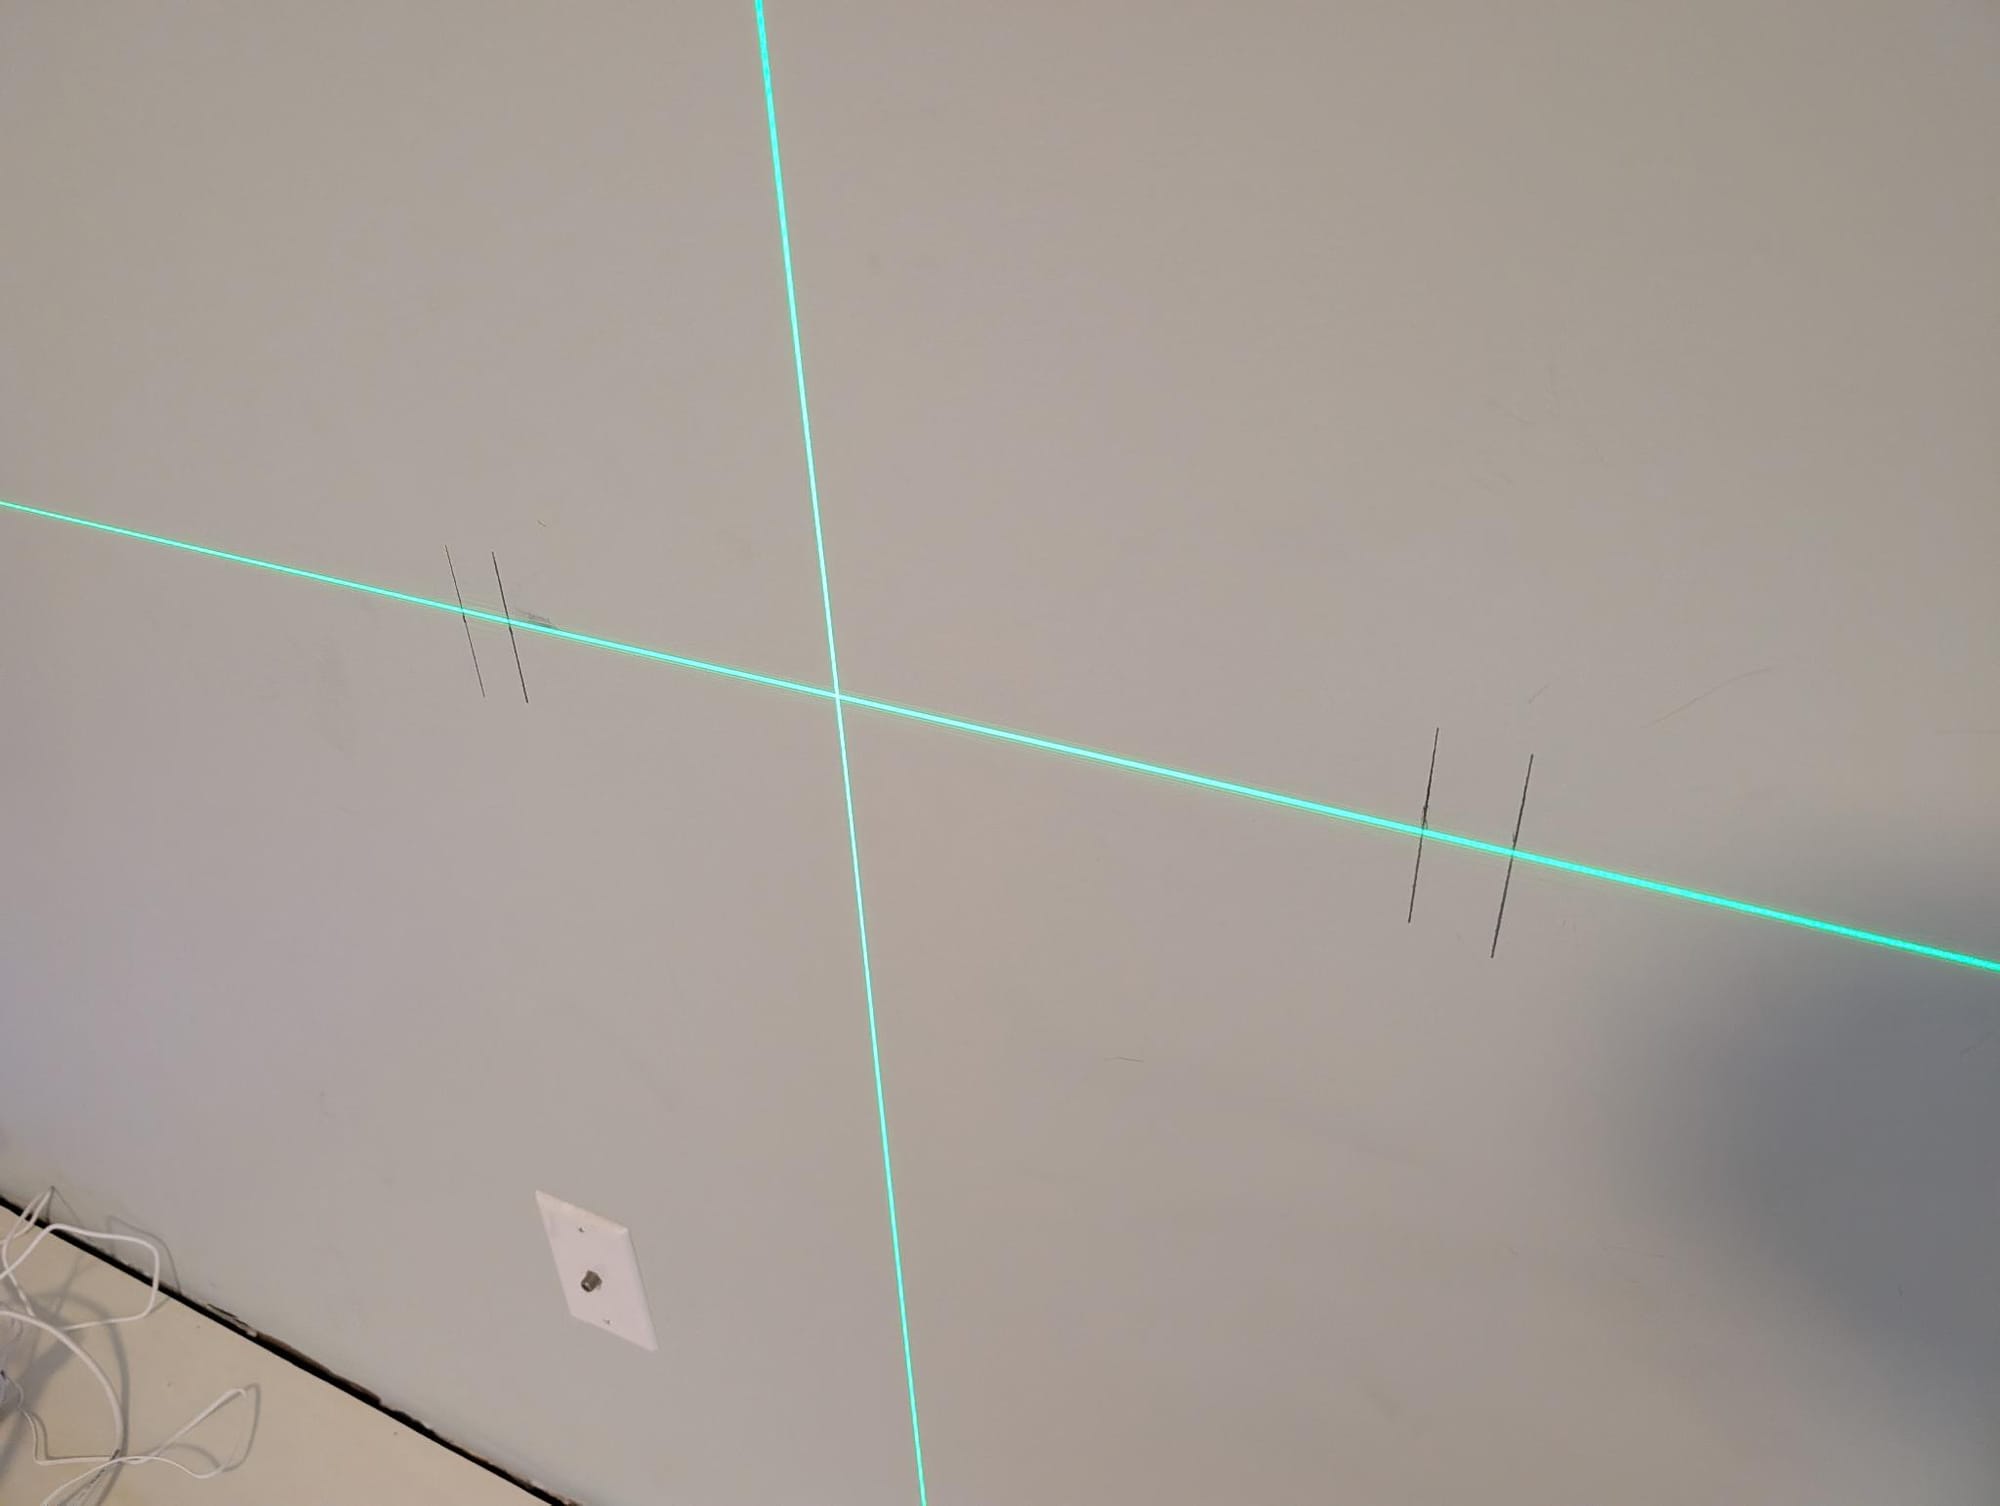
Next, I built a 3-1/4" tall platform for the cabinets to rest upon. This would give me clearance to run a baseboard moulding beneath them. It also contributed to the 34" height of the countertop (3-1/4" platform + 30" cabinet + 3/4" countertop). The platform was held together with wood glue and brad nails. I also had to drill a small hole in it to feed the fiber-optic Internet cable through. There was only a 15-minute Internet outage, so not too bad.
Then I had to screw wall supports for the countertop into them. I used a stud finder to, you know, find the studs. The laser level made it easy to ensure the supports were all at the correct height. They are just pieces of scrap plywood leftover from making the platform.
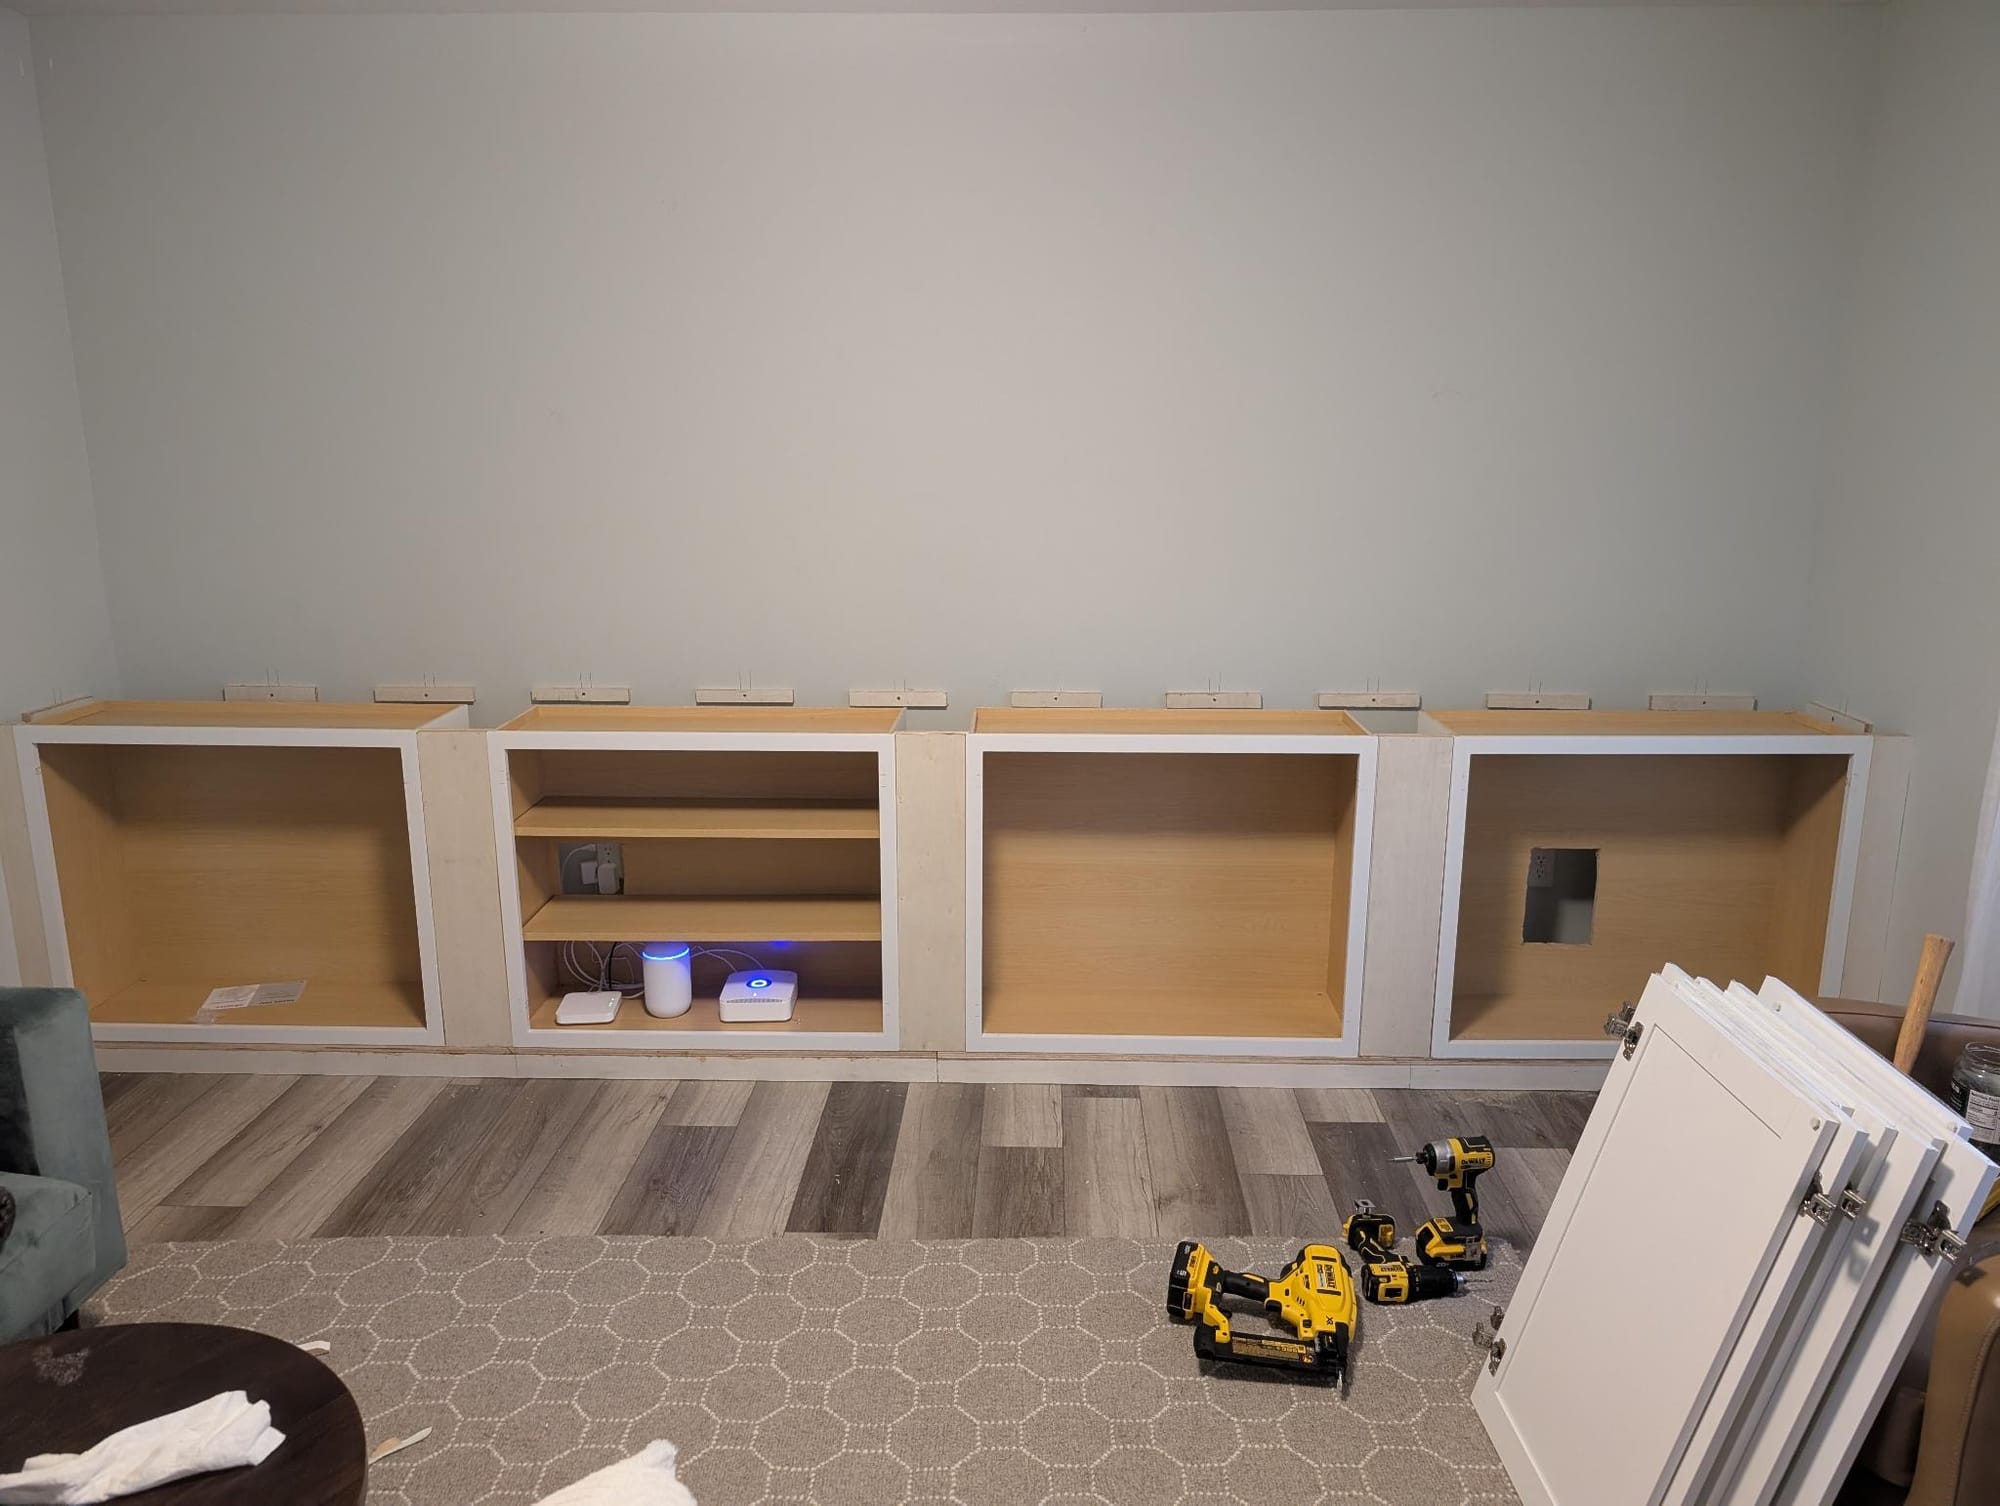
With the platform and supports in place, I could start installing the cabinets. I screwed them into the platform, then put spacers in between. The spacers are supported by pieces of scrap plywood behind them and attached using wood screws, wood glue, and brad nails.
Then I removed the doors from the cabinets so I wouldn't damage them during the rest of the build, and cut a hole in the back of two of them to provide access to the power outlets behind them. This didn't turn out as well as I had hoped, but also not as badly as I had feared either. The prefab cabinets are made of laminated particle board, so the cuts are pretty rough, but I guess I should be happy that the reciprocating saw didn't completely obliterate them.
Finally, I placed the countertop on the cabinets and wall supports. Since it is so long, I had to make it from two sheets of plywood that I cut to size, then rounded one edge with the router and sanded to a smooth finish with the orbital sander. It is attached to the cabinets and wall supports with more wood glue and brad nails.
This seemed like a good stopping point for the day.

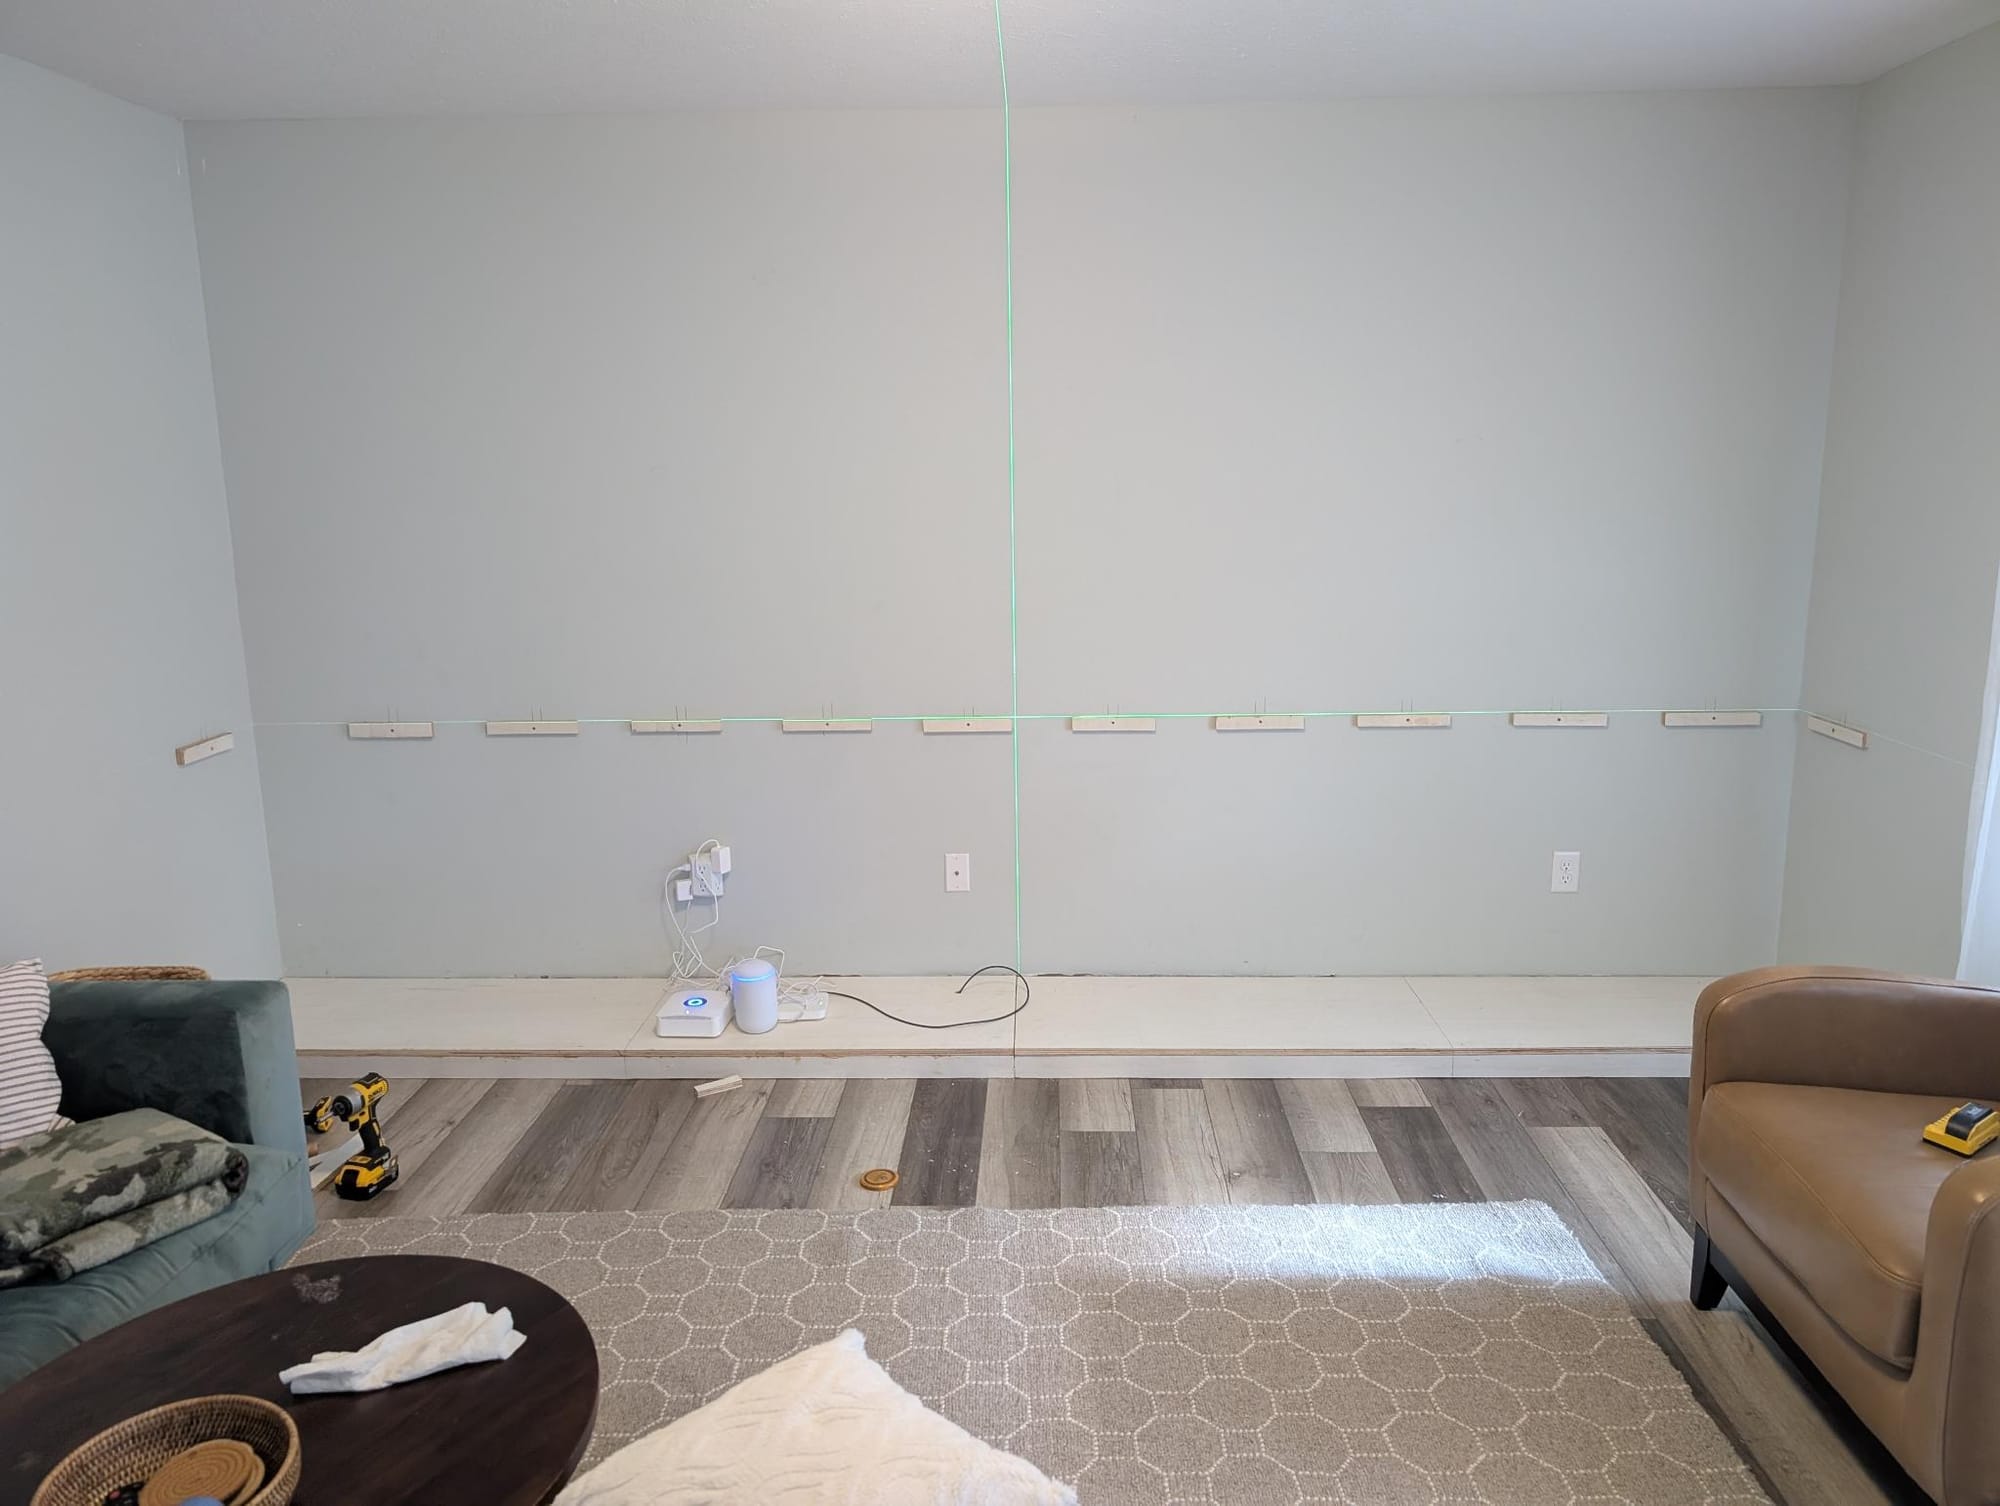
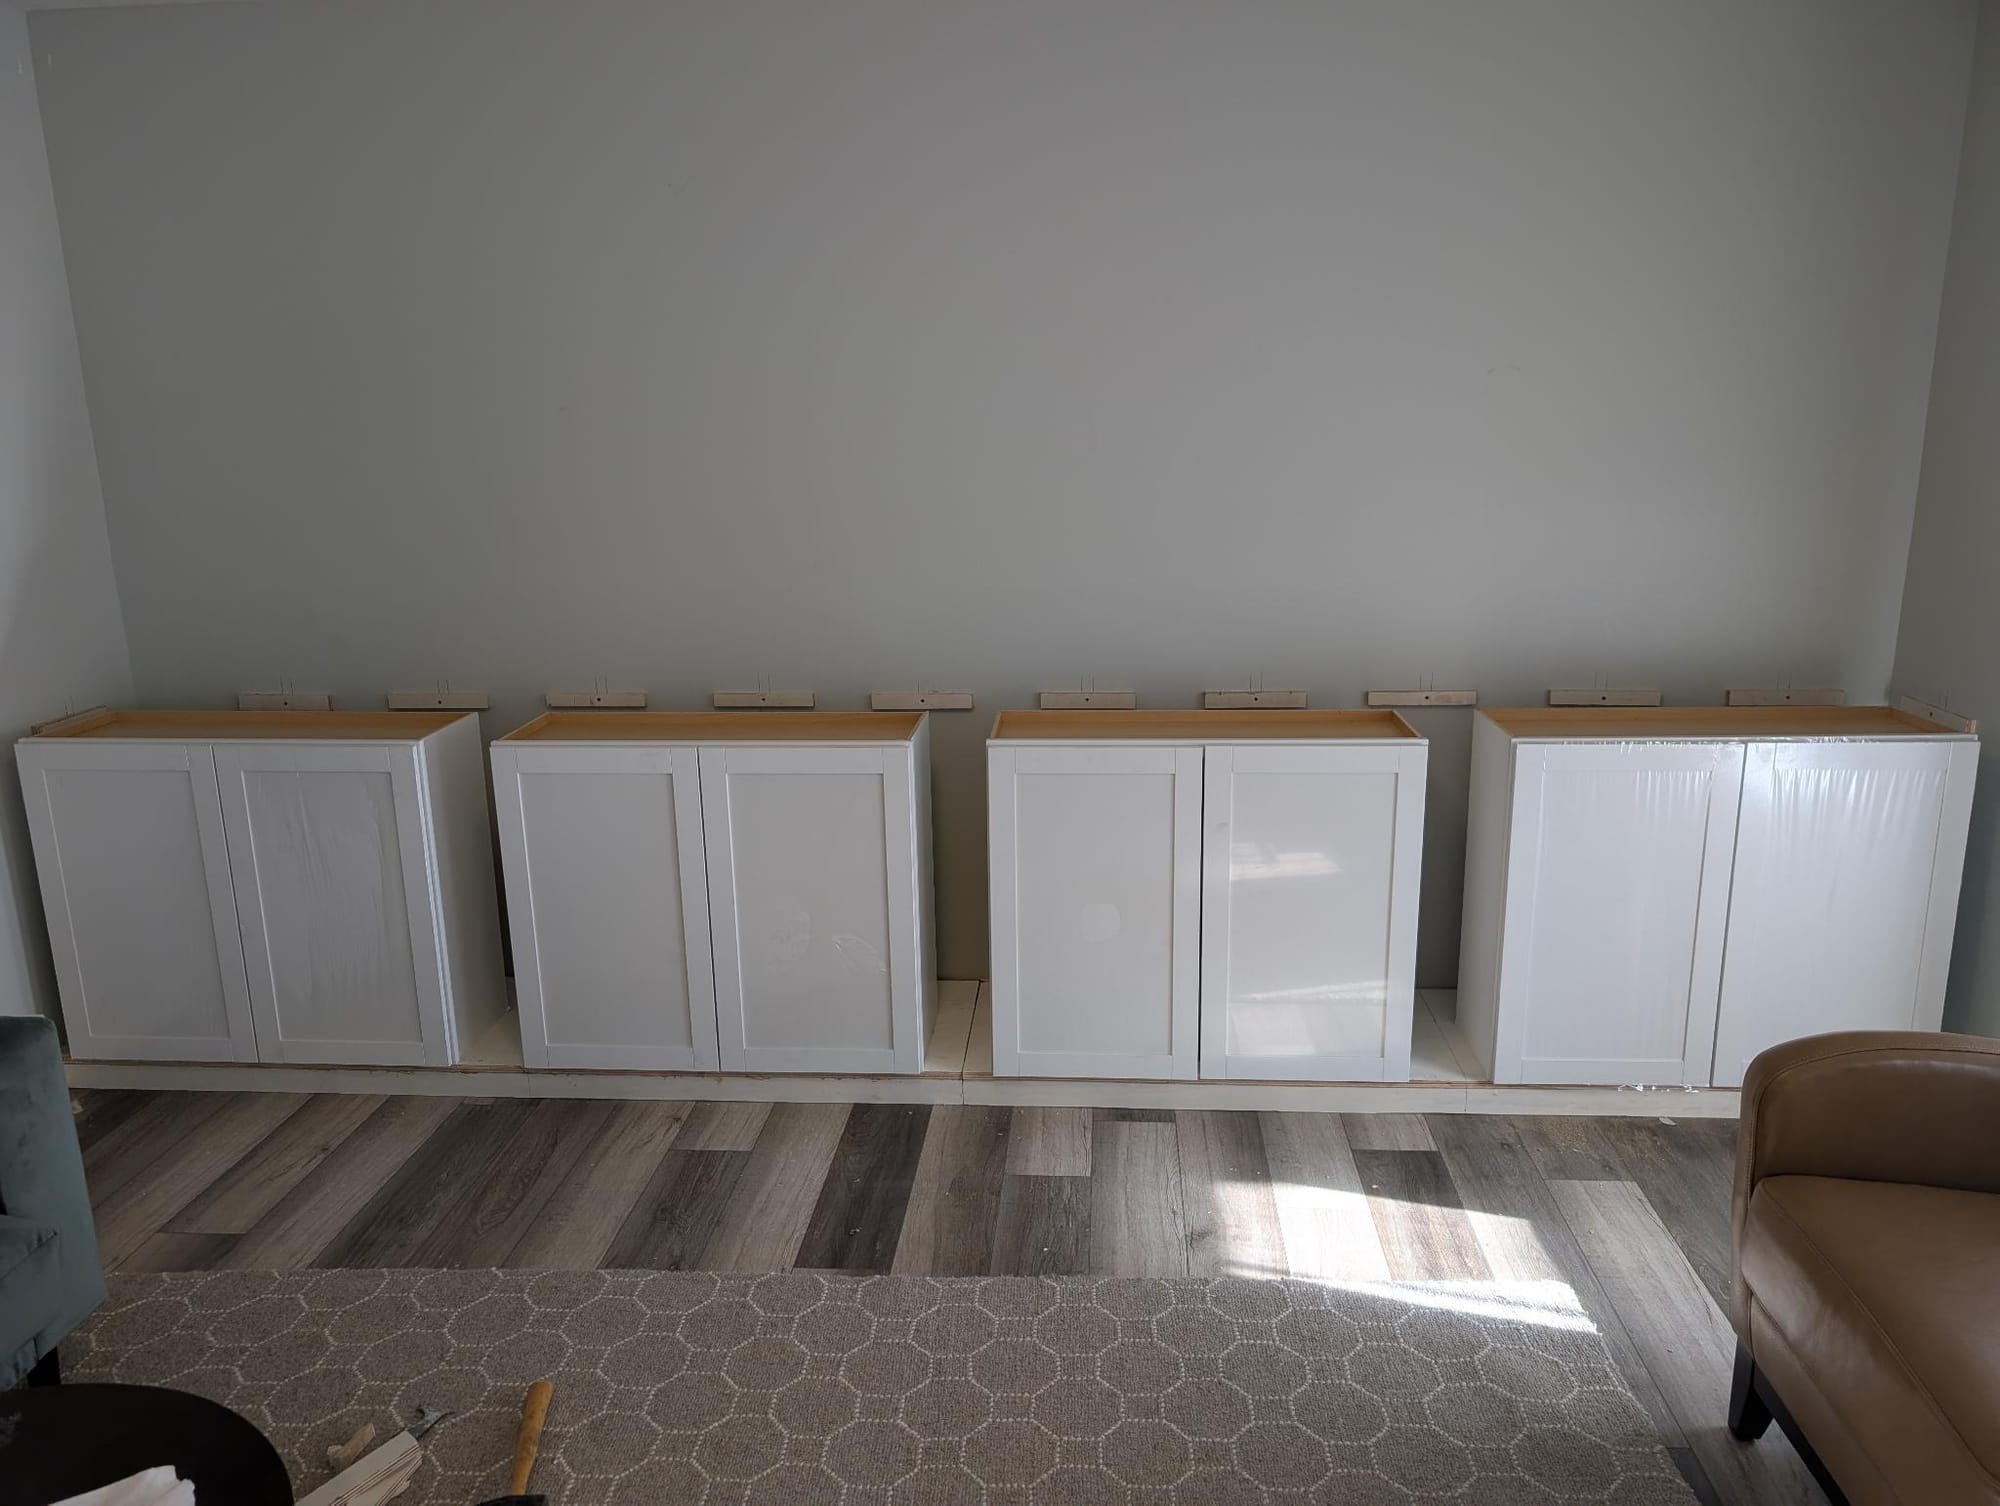
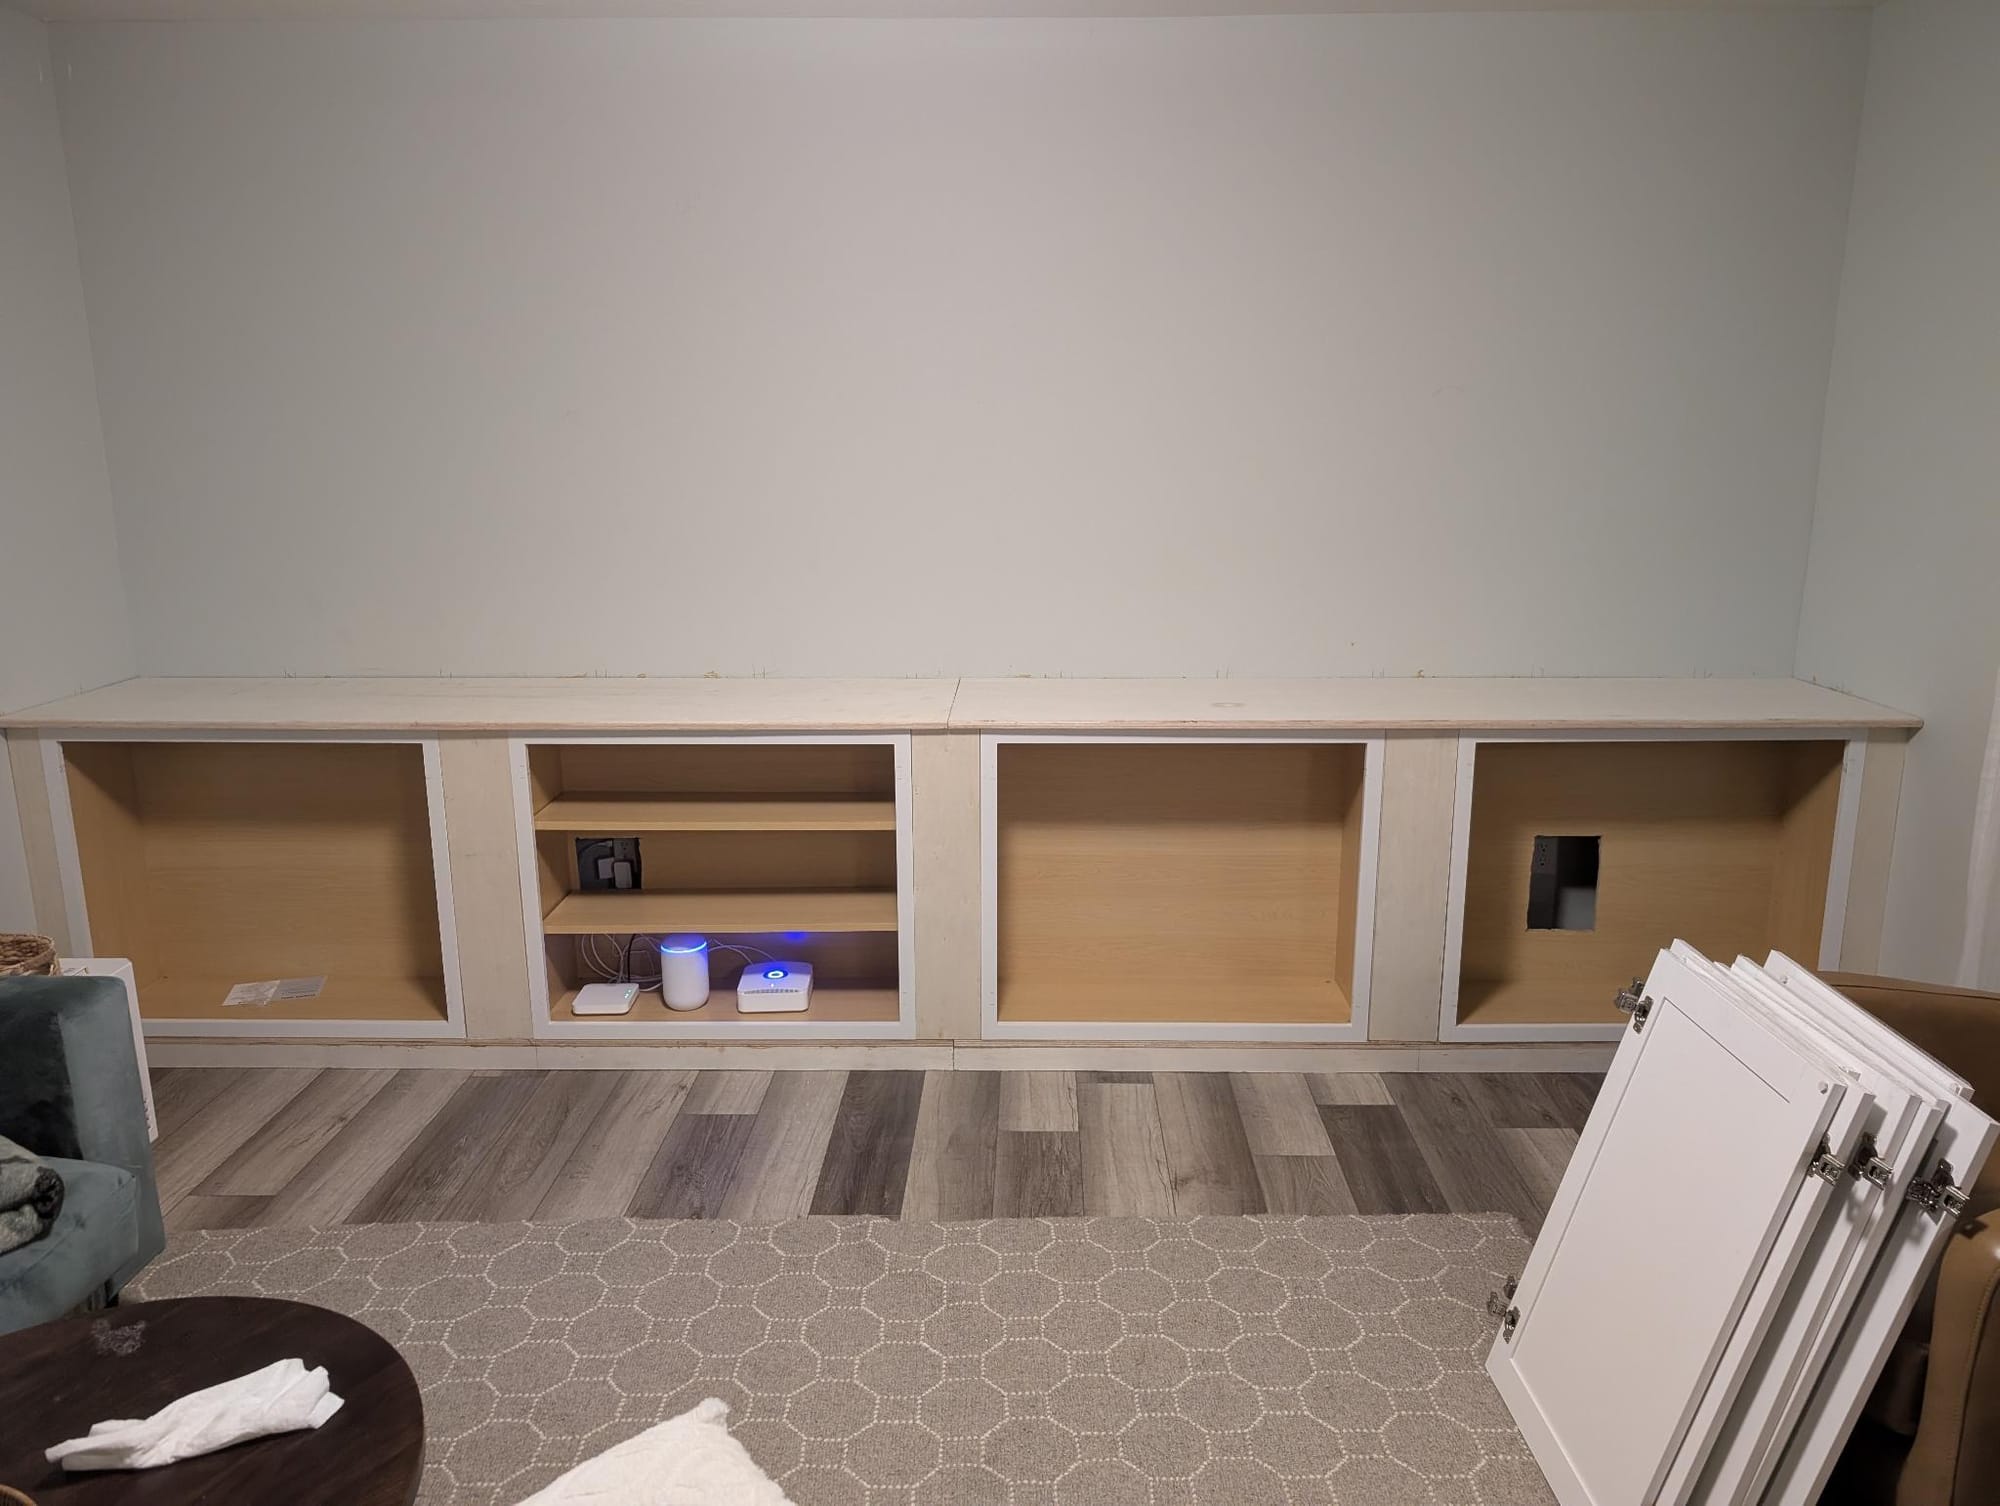
Day 1: Assemble the Lower Portion
Day 2
On day 2, I moved on to the upper portion with the custom shelves. I assembled them in three sections in the garage (left, middle, and right) with wood glue, dowels, and brand nails, then attached them to the studs and each other with wood screws.
Then I needed to apply all of the finishing touches. First, the crown moulding across the top, which is nailed into the ceiling and the shelves. Then the Poplar face plates to cover the rough edges of the plywood. They are attached with wood glue and brad nails. Then the baseboard moulding and shoe moulding to match that which already runs around the rest of the room.
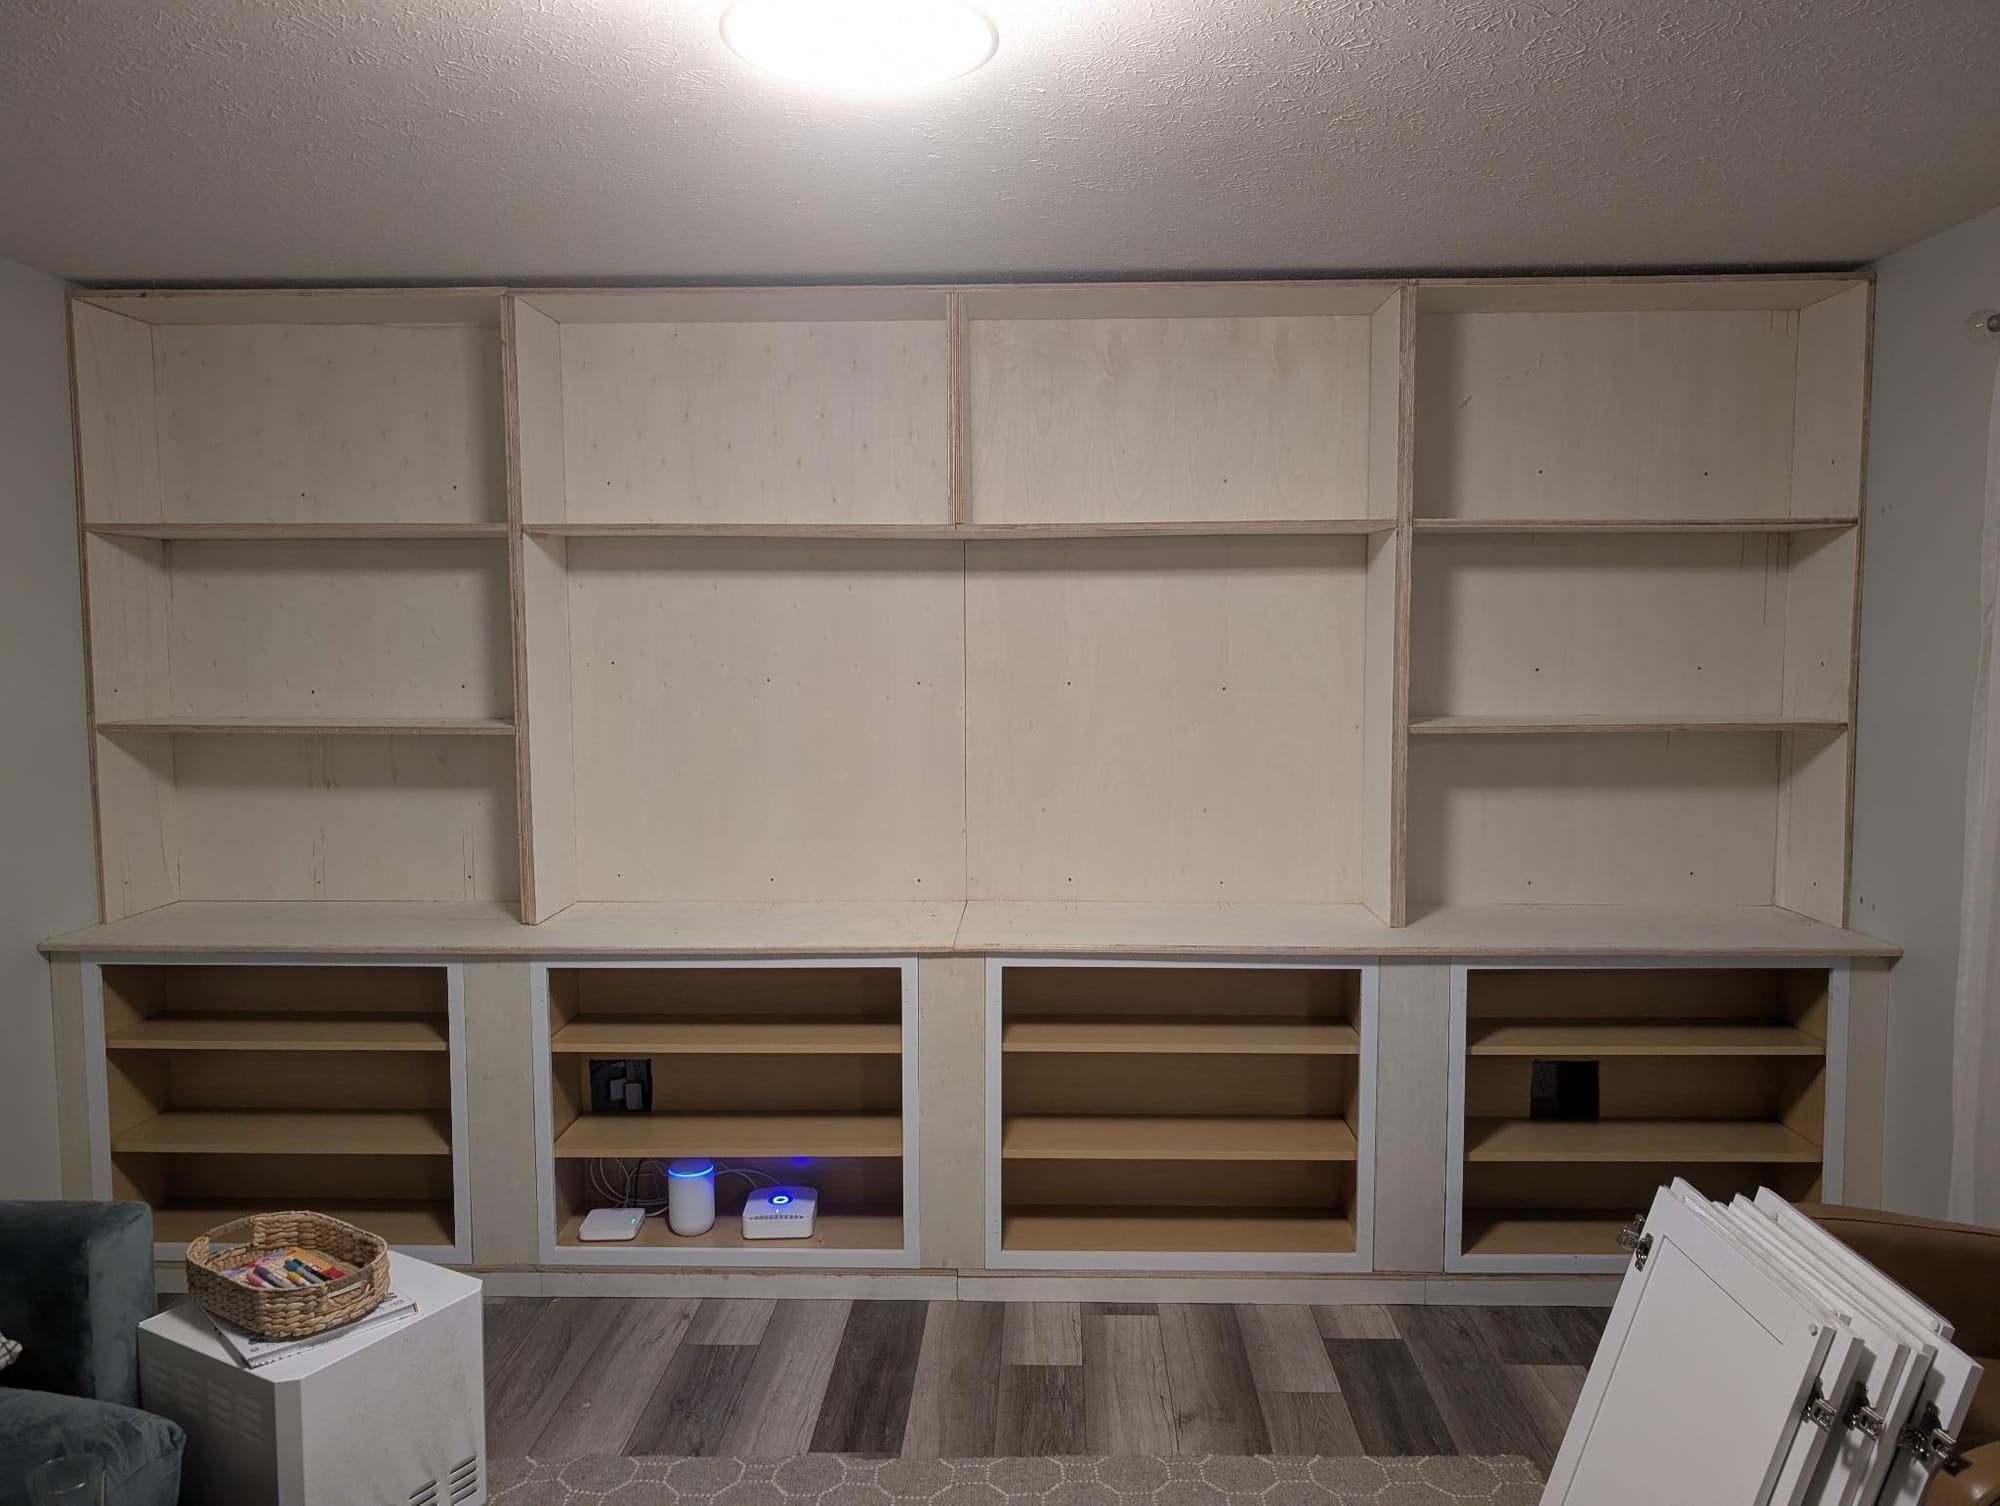

Day 2: Assemble the Upper Portion
Day 3 and 4
I spent most of day 3 filling in all of my little mistakes with caulk. I think one can measure their skill as a carpenter by how much caulk they use at the end of a project. If that's true, then I'm a trash carpenter because I used a lot of caulk. But it filled in all of the gaps, dents, and holes, so all is well that ends well, right?
I also cut a 3" hole in the countertop to feed power cords for the TV, soundbar, and Roku through, and covered it with an extra grommet cover I had from the Uplift Desk in my office.
On day 4, I painted everything with the same paint as the trim throughout the rest of the house. It took about three coats to completely cover the plywood. And I forgot how tedious painting moulding is without getting any on the floor or walls.
The last thing was the cabinet hardware, and we're done!

Conclusion
This was a really fun project! I was able to do it all on my own (except for needing Crystal and Lily to help me carry in the assembled shelving units from the garage) and in only four days. Nothing deviated too far from the plan, and I still have all my fingers.
I think I'll be having some more projects coming soon. Next up will likely be either a 5'x3' solo-board-gaming coffee table for my office or painting the kitchen cabinets.