DIY Pergola
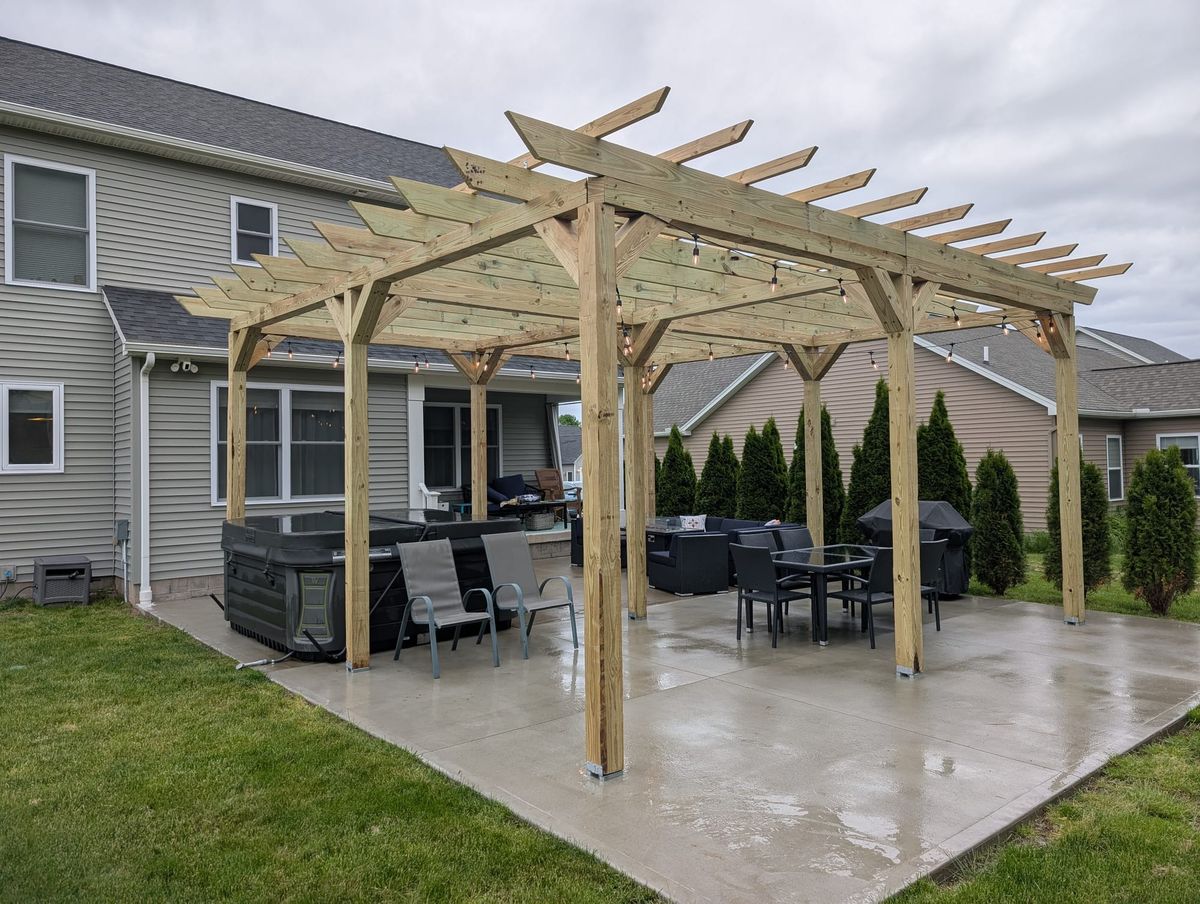
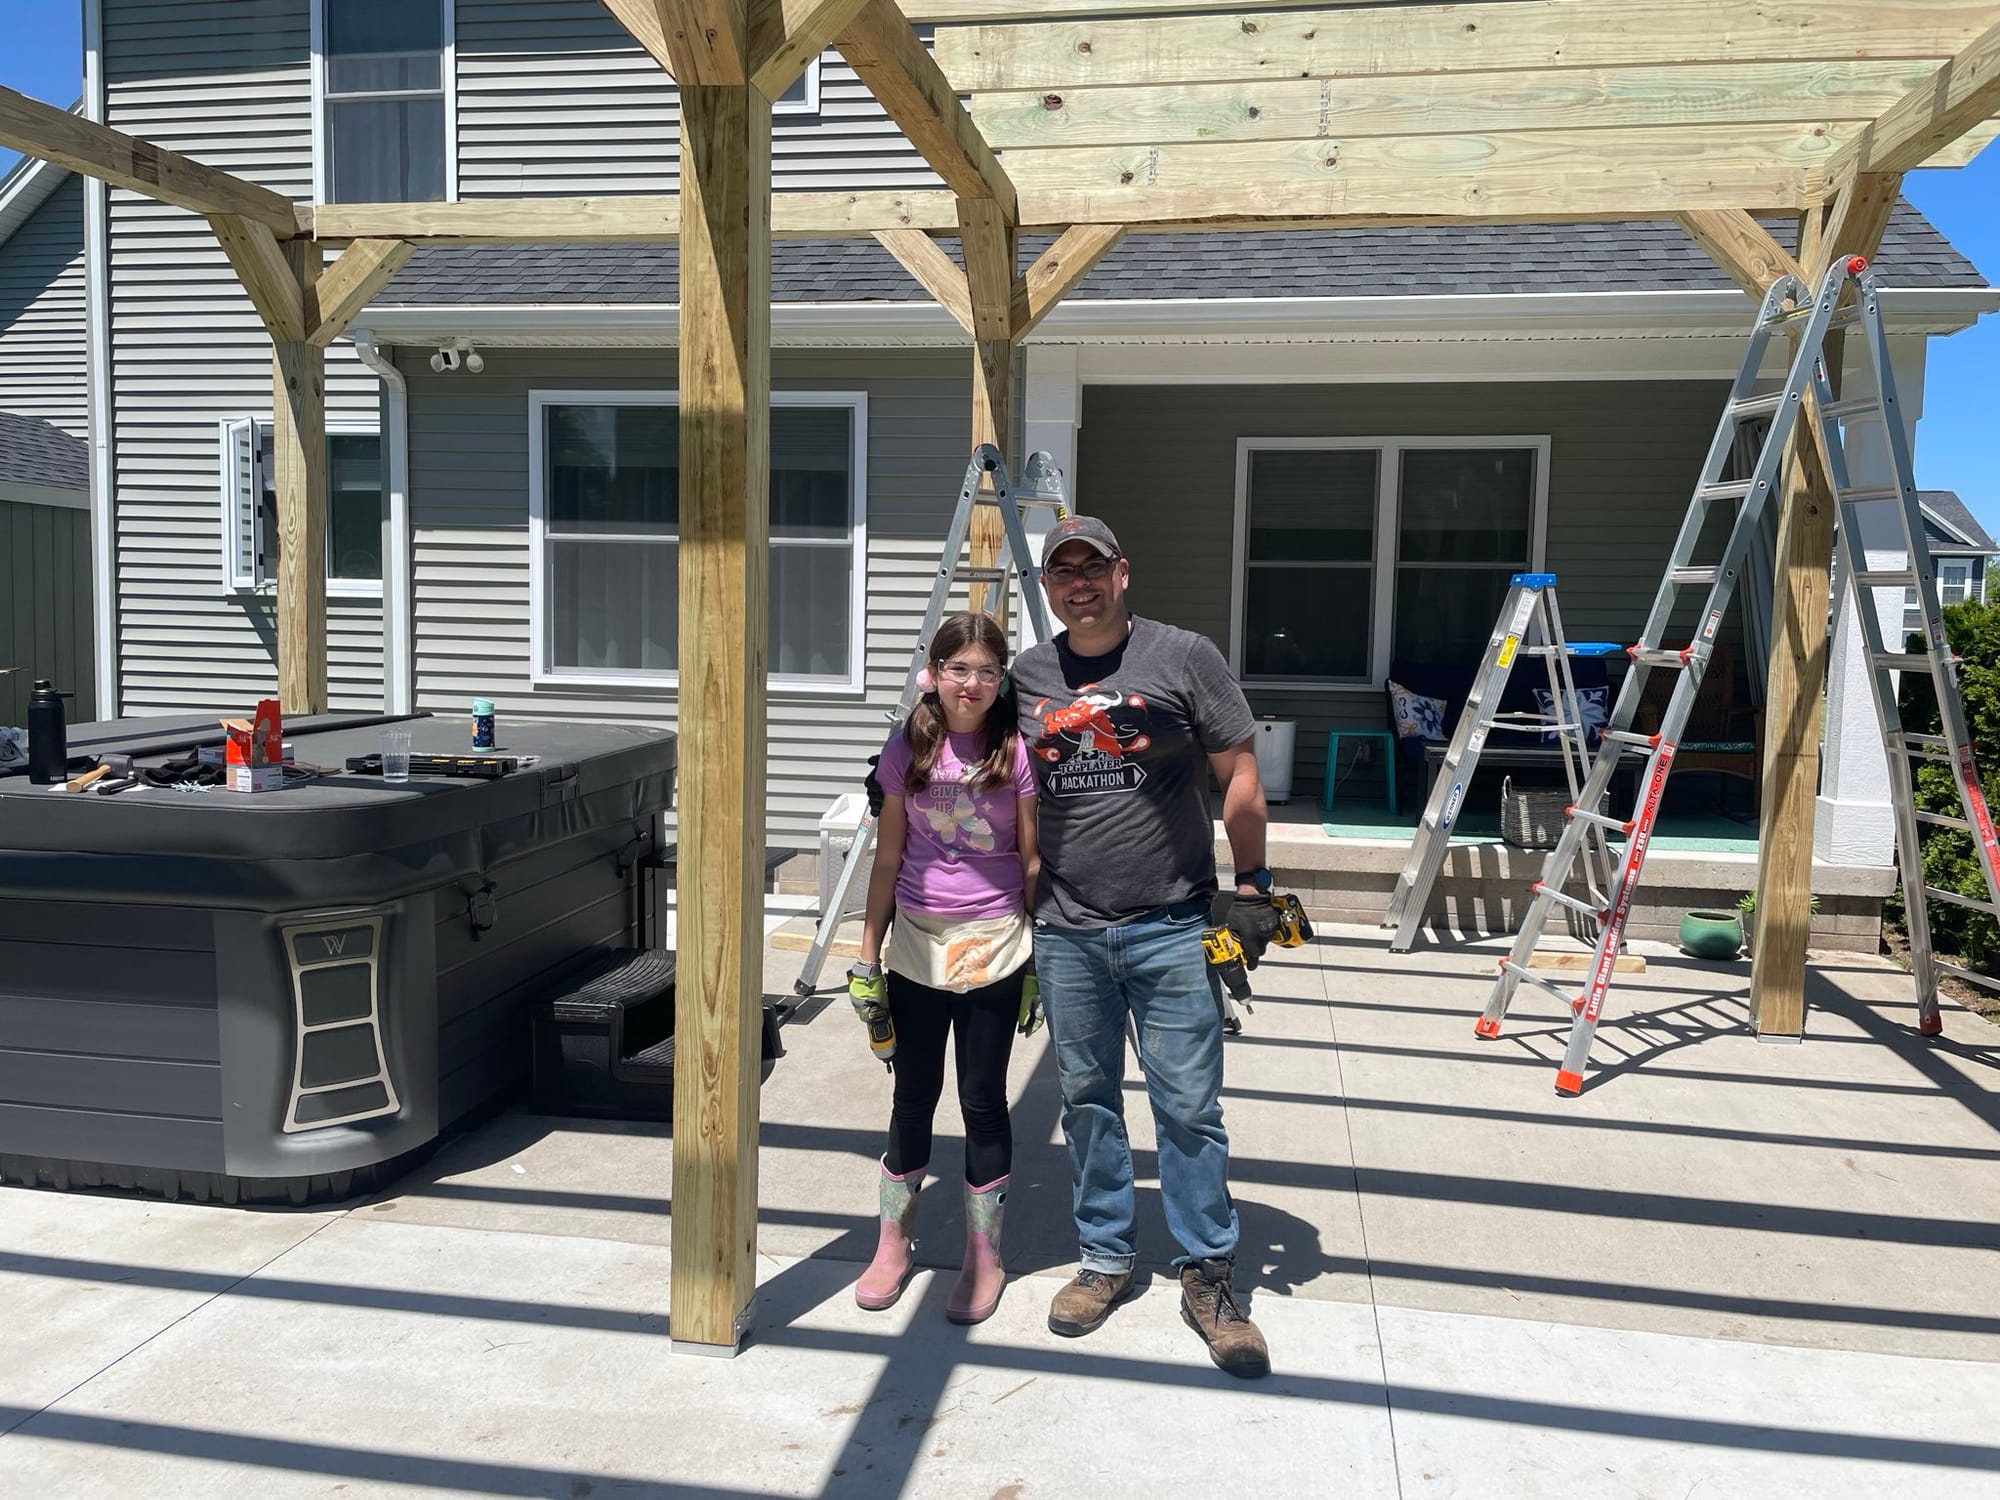
In June 2025, Lily and I built a huge pergola over the back patio in four days for about $3,000.
On one hand, building a new house is great because you can make everything exactly how you want it. On the other hand, turning a newly built house into a home takes a lot of work. So ever since we built ours in 2018, Crystal and I keep coming up with new projects to make it nice. Landscaping was top priority for a few years, but this year, we wanted to dress up our back patio.
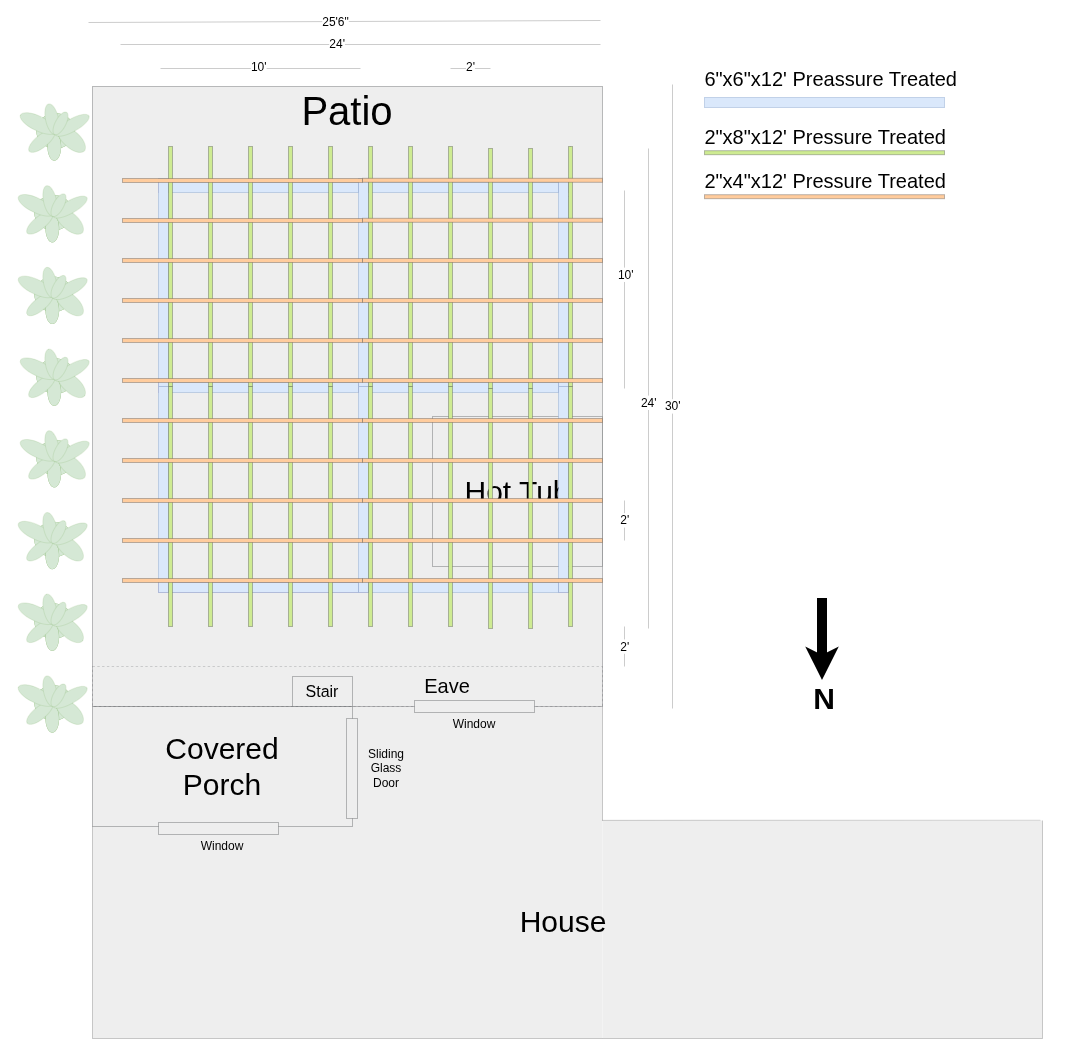
I suggested a pergola. It defines the space, provides partial shade, and gives us places to hang things like lights, bird feeders, or a hammock. Our patio is 25.5'x30' so if we cover the whole thing, it'd be a big one! There aren't any kits for that, so I had to design my own.
Design
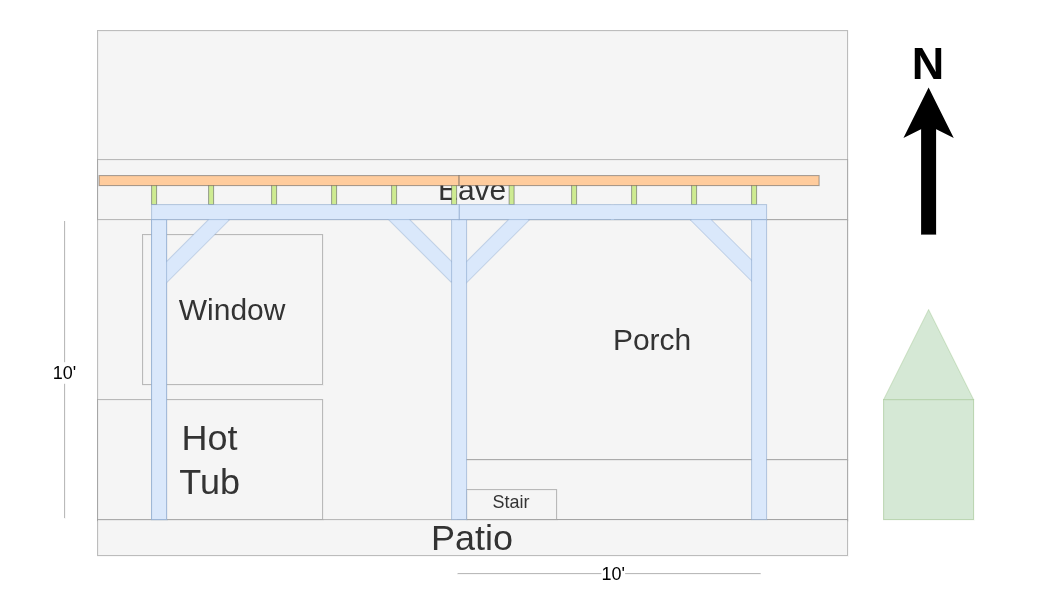
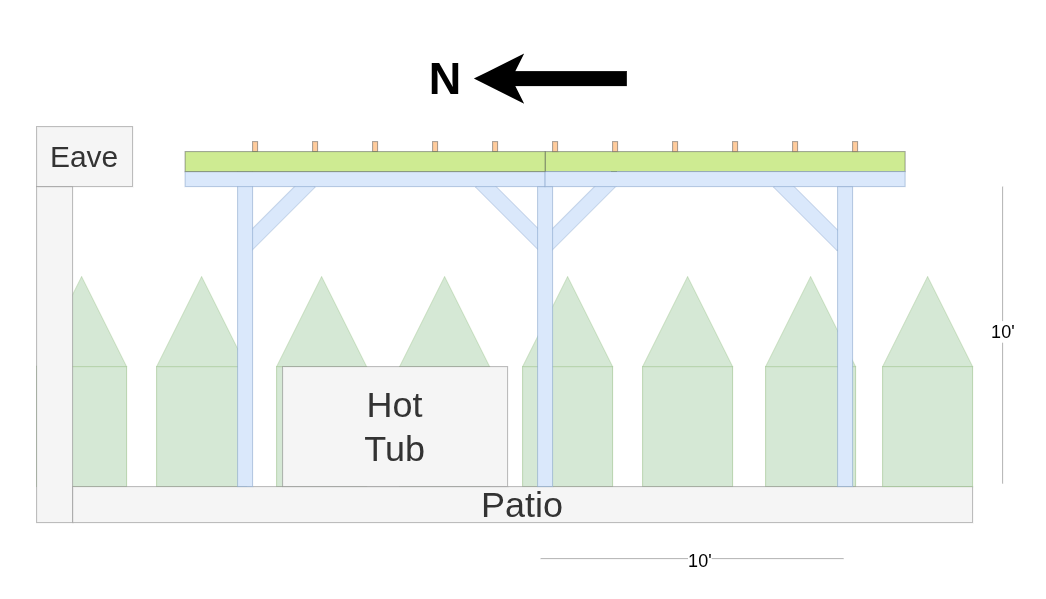
In general, the design is pretty straight forward. It's a 24'x24'x1.5' lattice roof supported by nine 6"x6"x10' posts. The only real trick was working around the hot tub and making sure the posts weren't in awkward places that obstruct walkways or important sight lines.
Diagrams created using draw.io.
Tools
I've built a few decks with my dad over the years so this wasn't too far out of my wheelhouse. I just didn't have the proper equipment to do the job. So for my birthday in May, I asked everyone who normally gets me gifts to instead pitch in towards a new set of power tools.
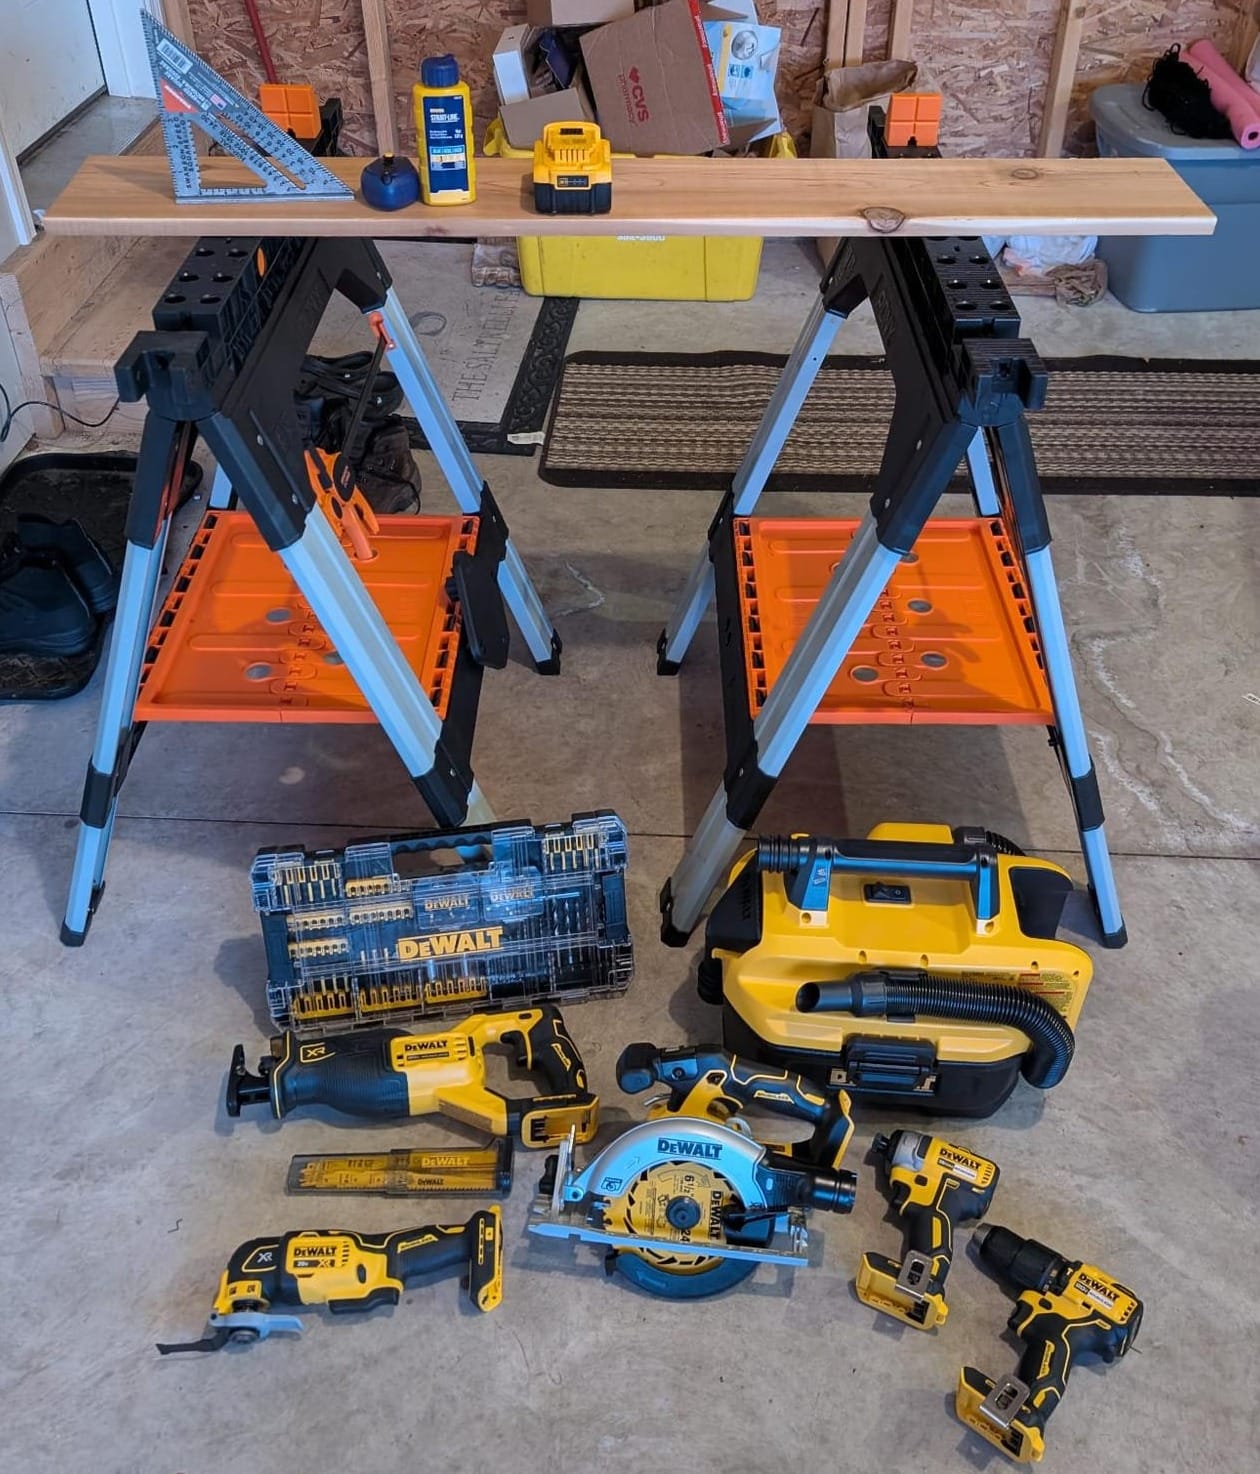
New Tools
- DeWalt 5-Tool Combo Kit
- Circular Saw
- Reciprocating Saw
- Hammer Drill
- Impact Driver
- Oscillating Multi-Tool
- 20V 5Ah Batteries (2)
- Battery Charger
- Contractor Bag
- DeWalt 2.0-Gallon Wet/Dry Shop Vacuum
- DeWalt Bit Driver Set
- Bosch Blue Xtreme 0.5"x6" Carbide Masonry Drill Bit for Hammer Drill
- DeWalt 6.5" 24-Tooth Circular Saw Blade
- DeWalt Reciprocating Saw Blade Set
- Pony Saw Horses (2)
- Swanson Speed Square
- Irwin Chalk Line
Total Cost: $900
Existing Tools
- 0.5" Socket Wrench
- 25' Tape Measure
- 18' Little Giant Telescoping Multi-Position Ladder
- 6' Step Ladder
Parts List
Next I had to order the lumber and hardware. I just bought it all from Lowes.com and paid the $80 delivery charge. About a week later they came and dumped it all in the grass next to my driveway. Totally worth it.
- 6"x6"x12' Pressure-Treated Lumber (24)
- 2"x8"x12' Pressure-Treated Lumber (22)
- 2"x4"x12' Pressure-Treated Lumber (22)
- Simpson Strong-Tie 6"x6" Wood-to-Concrete Bases (9)
- Simpson Strong-Tie 0.5"x4" Concrete Anchors (9)
- Simpson Strong-Tie 1.548"x1.375" Galvanized Steel Angle Brackets (210)
- Simpson Strong-Tie #9x1.5" Galvanized Steel Exterior Wood Screws (1000)
- Simpson Strong-Tie #12x8" Exterior Wood Screws (150)
- Harbor Breeze 48' Plug-in Black Outdoor String Light with 18 White-Light LED Edison Bulbs (2)
- 15' Light Duty Extension Cord
- Wireless Remote-Controlled Outlet
- 0.25" Plastic Low-Voltage Cable Staples (25)
Total Cost: $3000
Construction
Day 1
Day 1 was mostly prep work. Lily and I cleared the patio of every thing except the hot tub. It's heavy (even when empty) and has a 240V electrical line connecting it to the house, so as much as would have liked to move it out of the way, it ain't going anywhere.
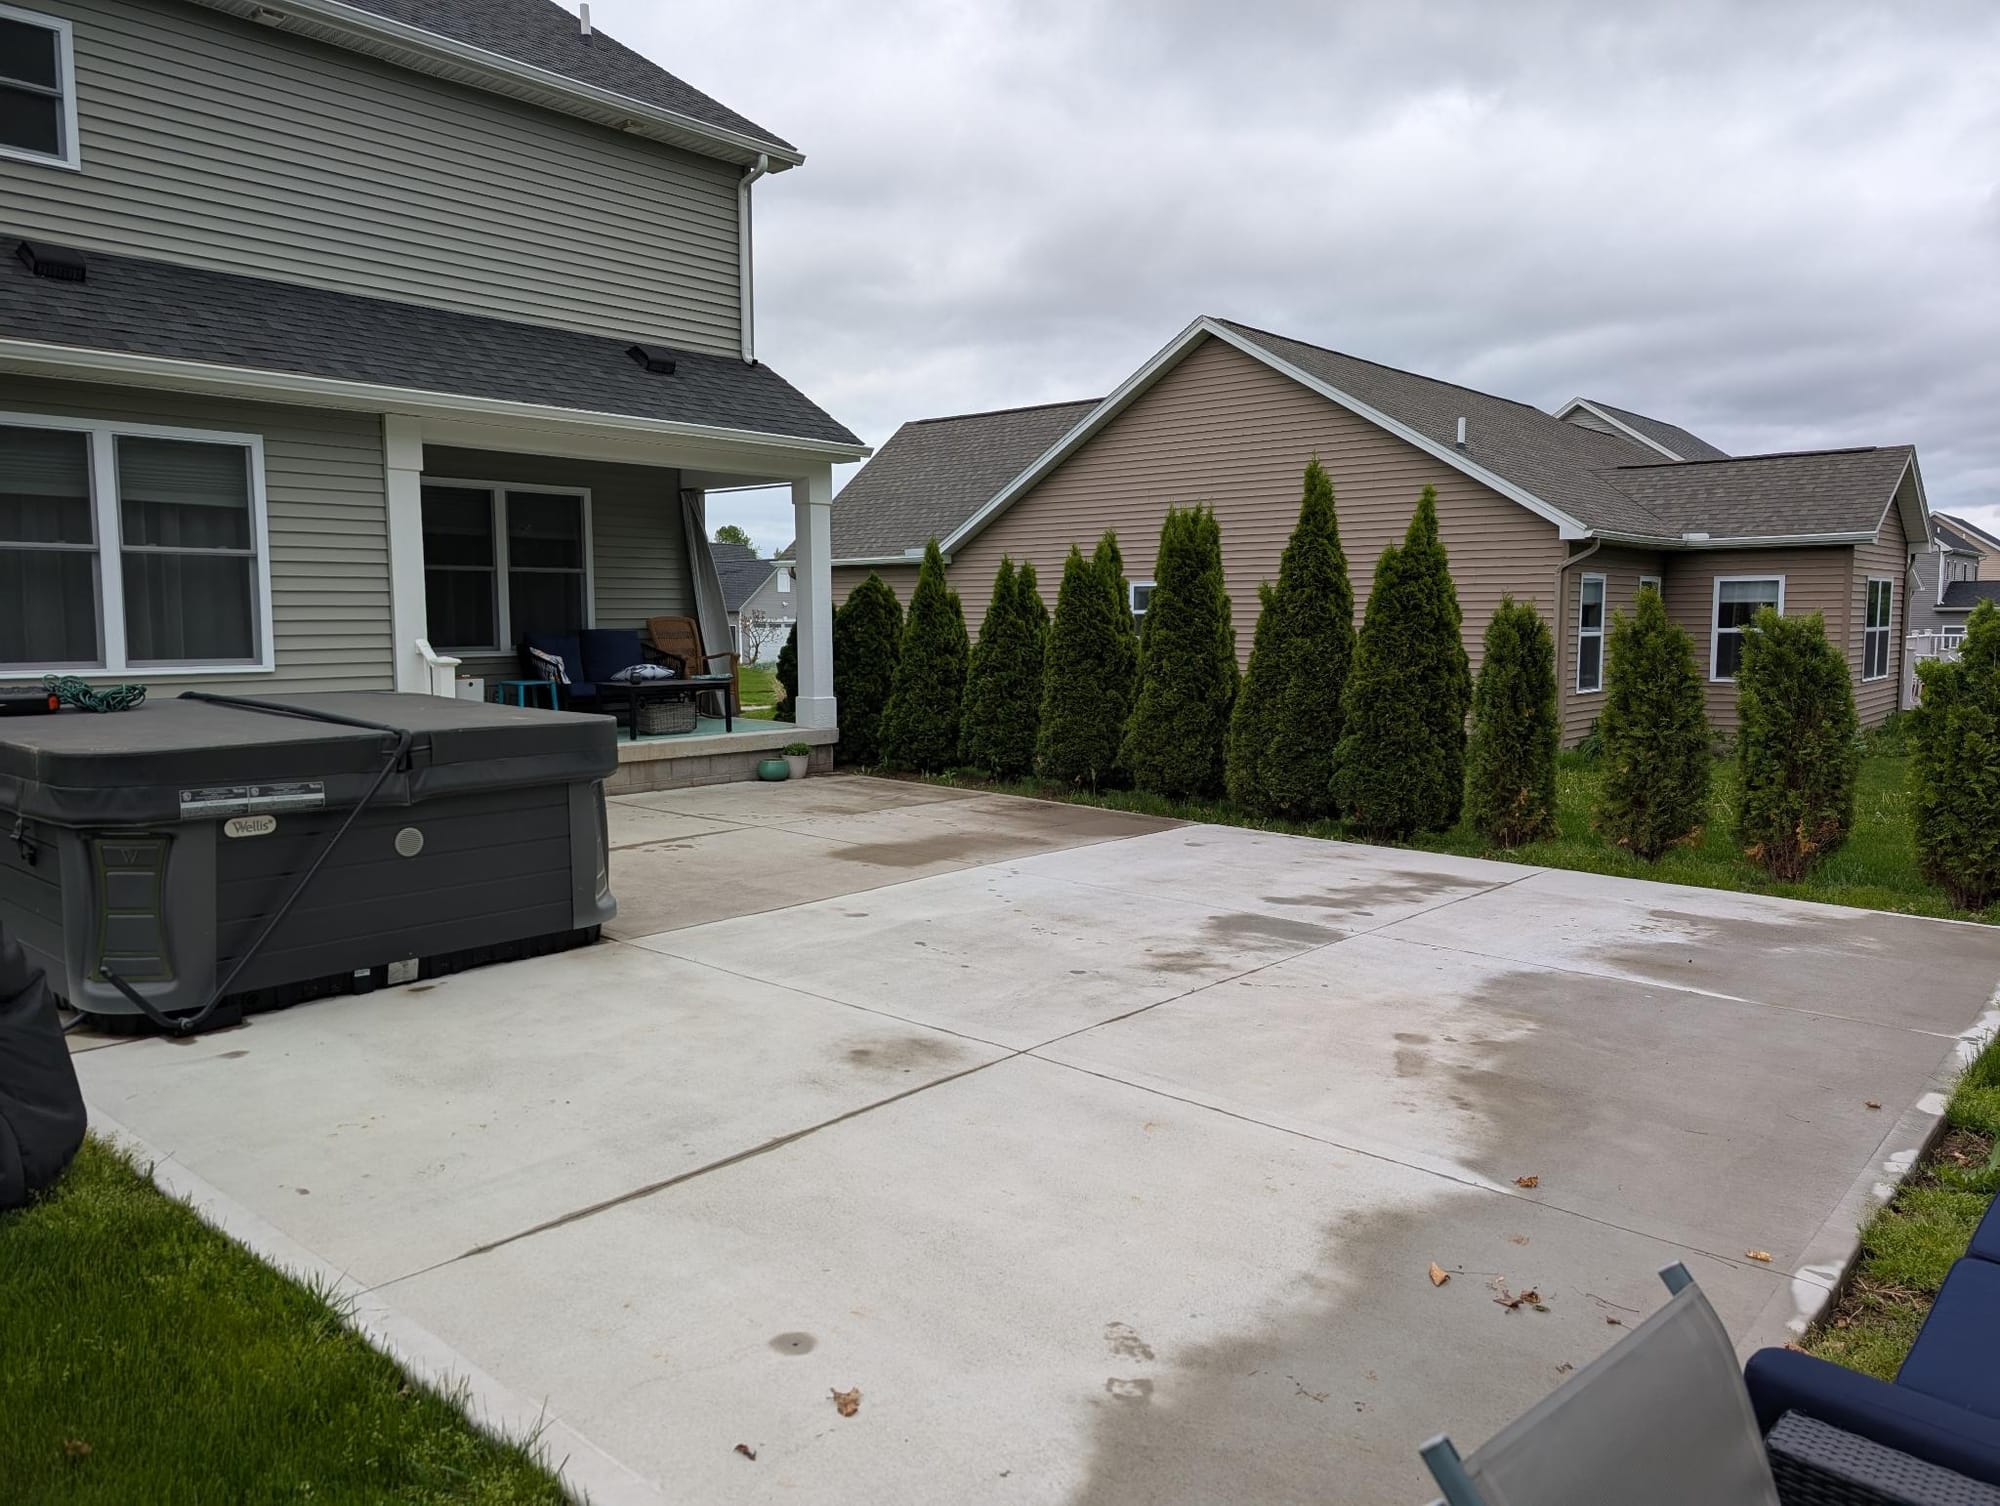
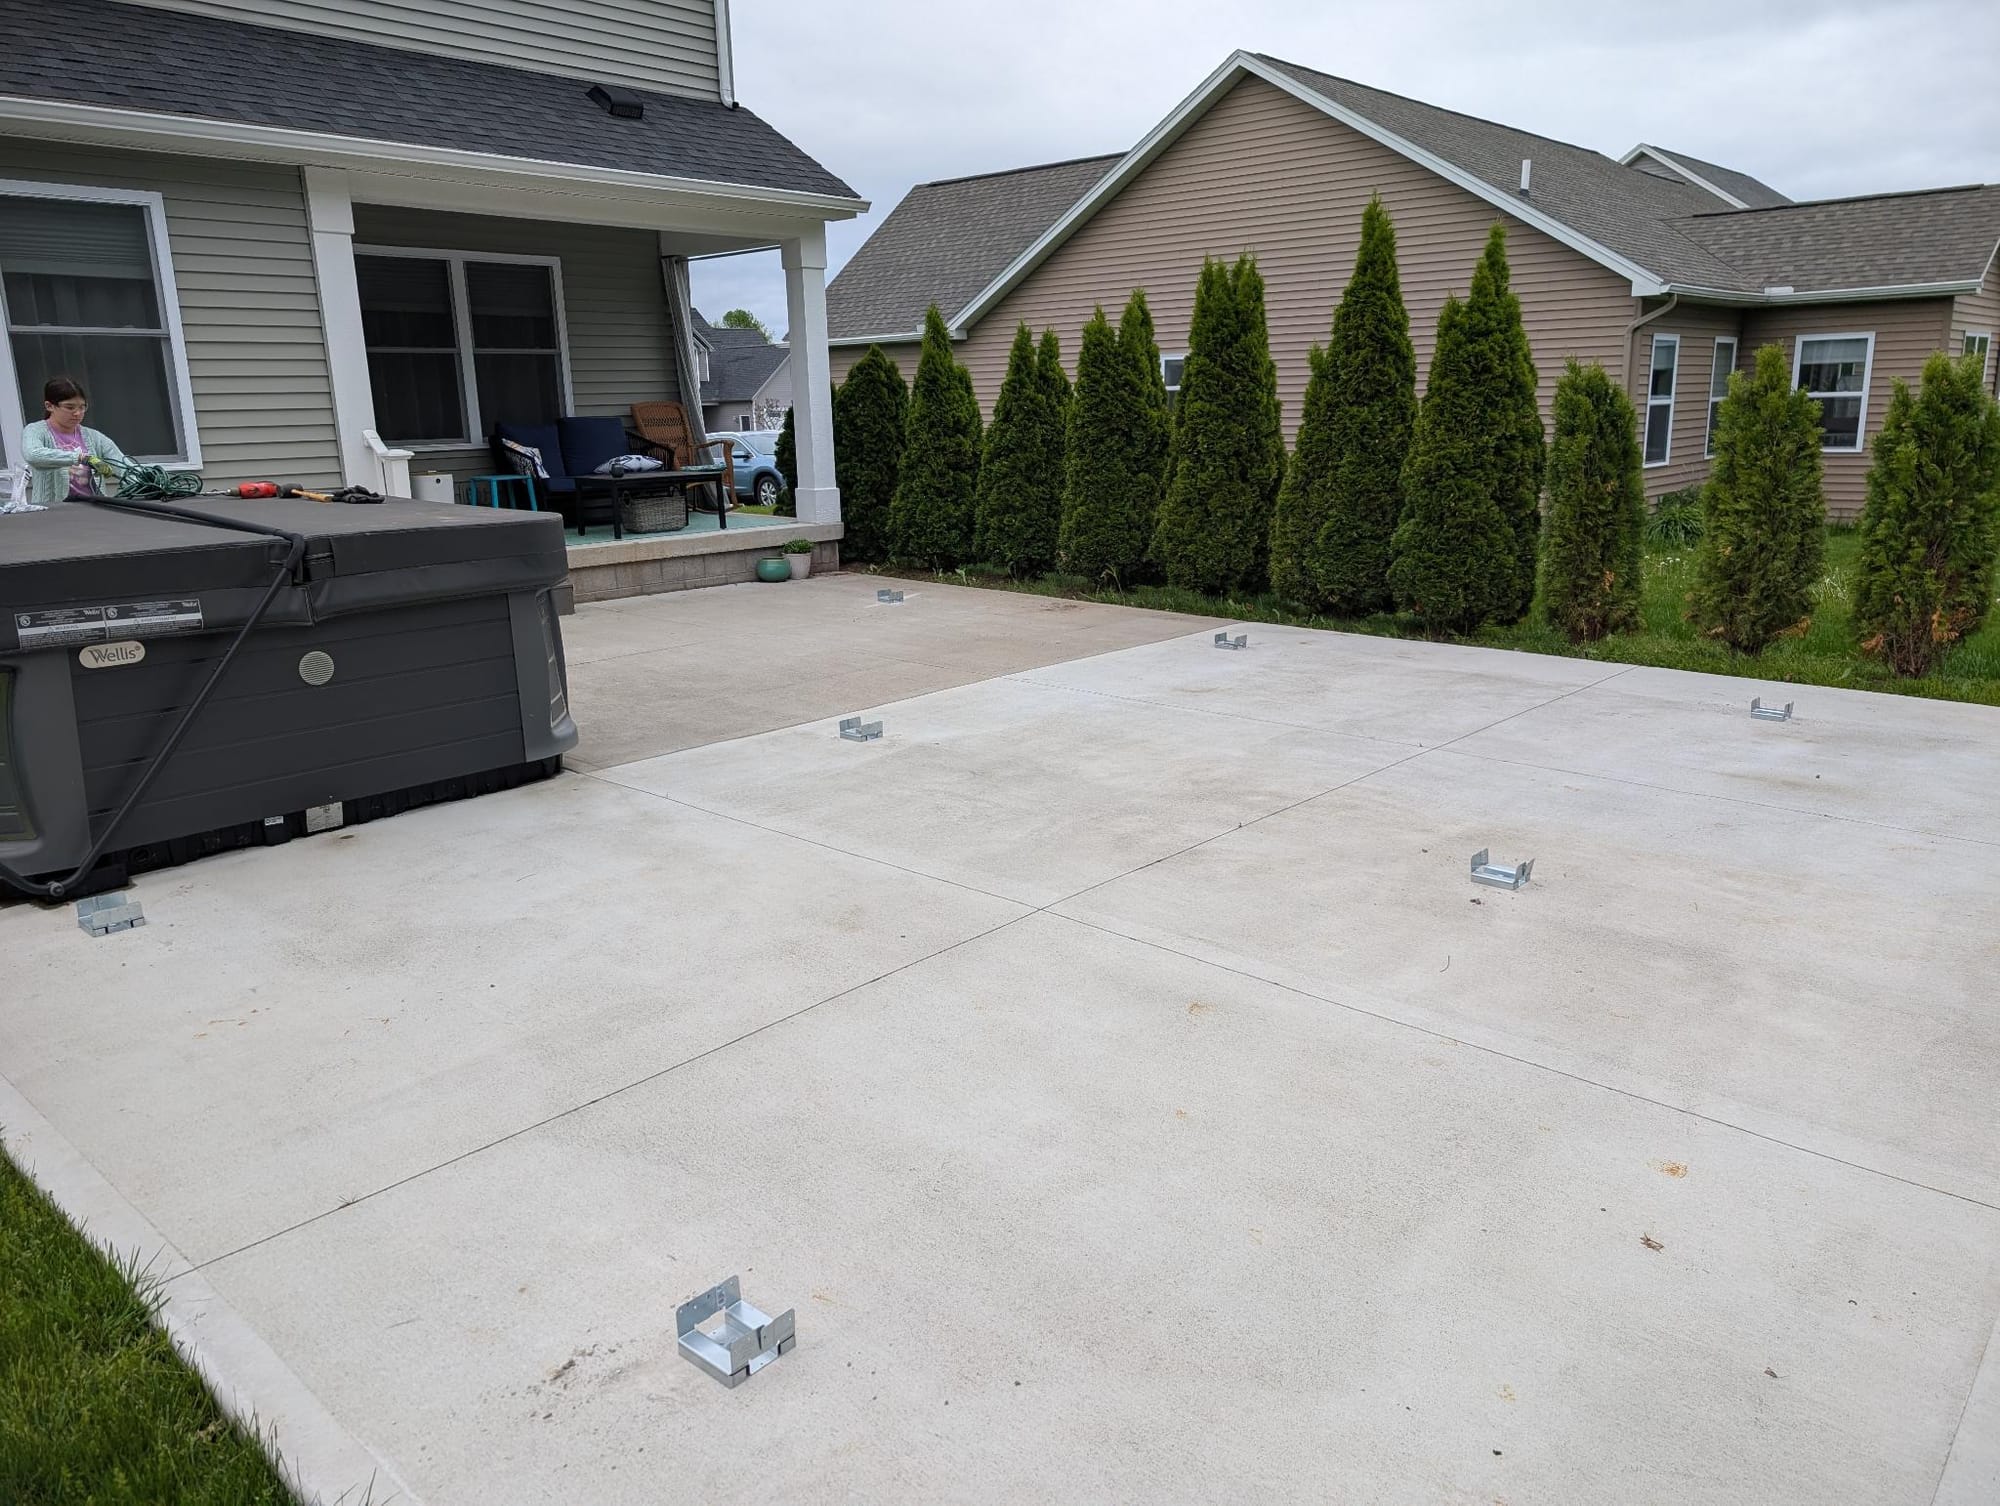
Then we secured the wood-to-concrete bases. These raise the feet of the posts up about an inch to protect them from standing water and prevent rot. They also ensure that an exceptionally strong gust of wind doesn't move the structure. We used the chalk line and tape measure to make sure everything is straight an square and the concrete drill bit to make our holes. Then we used a socket wrench to tighten the concrete anchors and secure the bases.

Finally, we cut the lumber to length. The 12' posts had to be cut down to 10' and the remaining 2' to be cut into knee braces to stabilize the posts. Cutting the 6"x6" posts was a huge pain in the ass because they are so thick. It took two cuts with the circular saw and a third cut with the reciprocating saw to get all the way through. It would have been easier to use 4"x4" posts, but with a structure this large, we really needed 6"x6" posts to support all the weight and withstand the high winds we occasionally get here. If I hadn't already spent $900 on tools, I would probably have bought a miter saw, which would have made shorter work of the 6"x6" posts.
Day 2
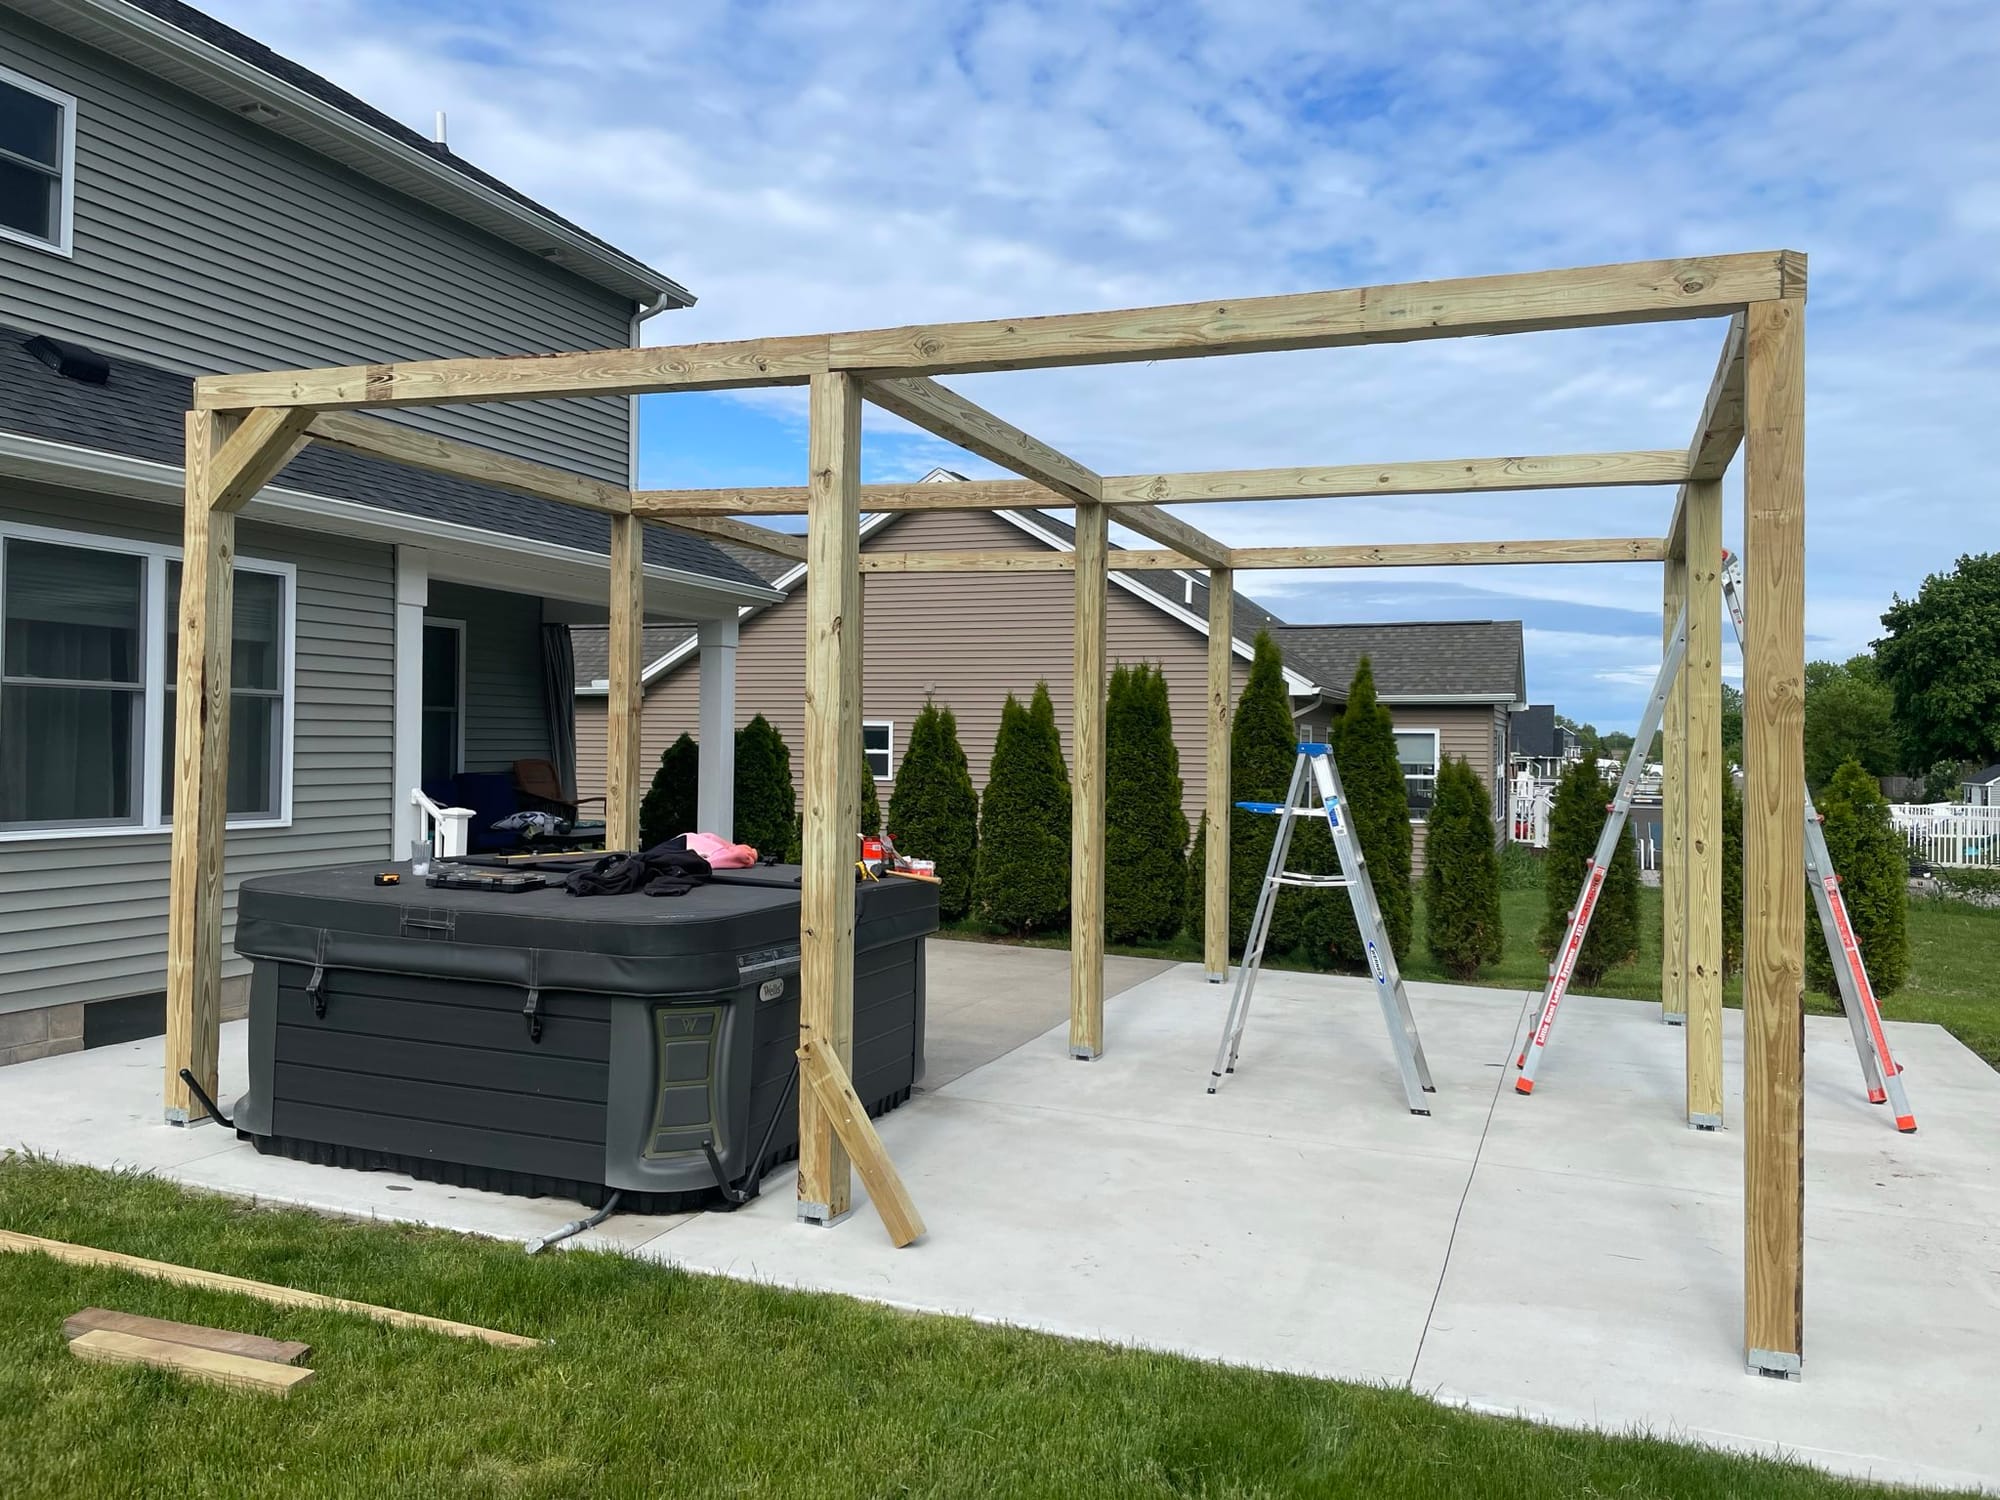
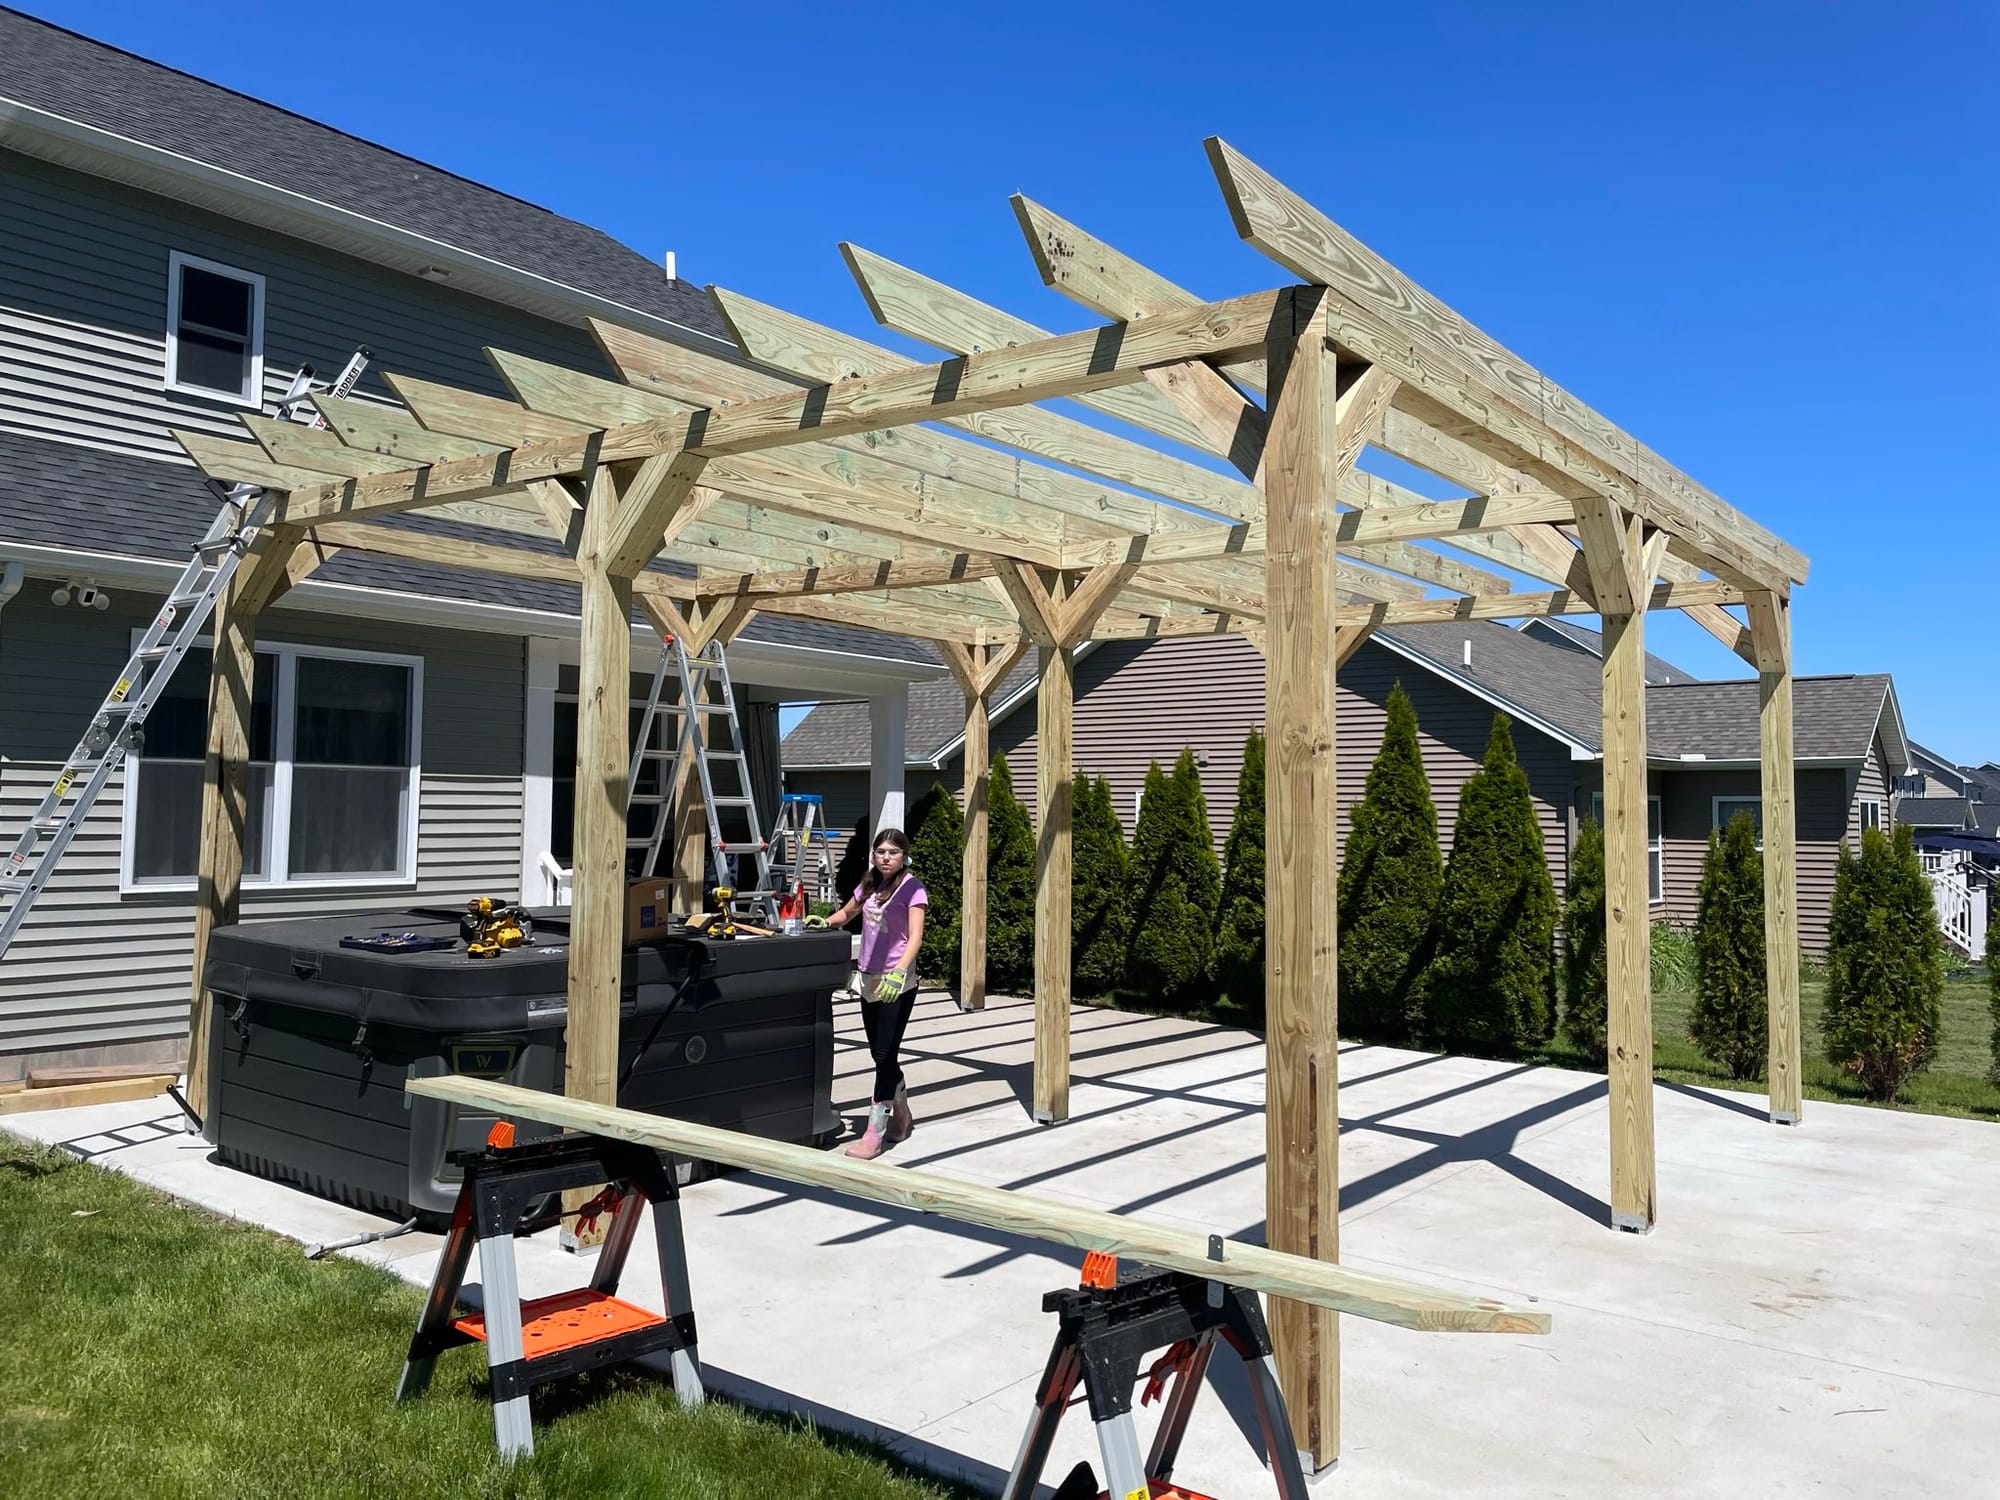
Day 2 was where most of the heavy lifting happened. The frame of the pergola is made from 6"x6"x10' pressure-treated lumber, which are about 100 lbs each. My neighbor came over an helped us get them all into place. Thanks, Dave!
The frame is held together with the #12x8" exterior wood screws. 8" seems like a really long screw, but after passing though a 6" post, it only leaves 2" on the other side. If I were to do it again, I might opt for 10" screws. Use an impact driver on these bad boys instead of a screw gun. They go in like a hot knife through butter.
I also wanted to get the knee braces in on day 2, but I was just too exhausted to finish. They'd have to wait till day 3.
Day 3
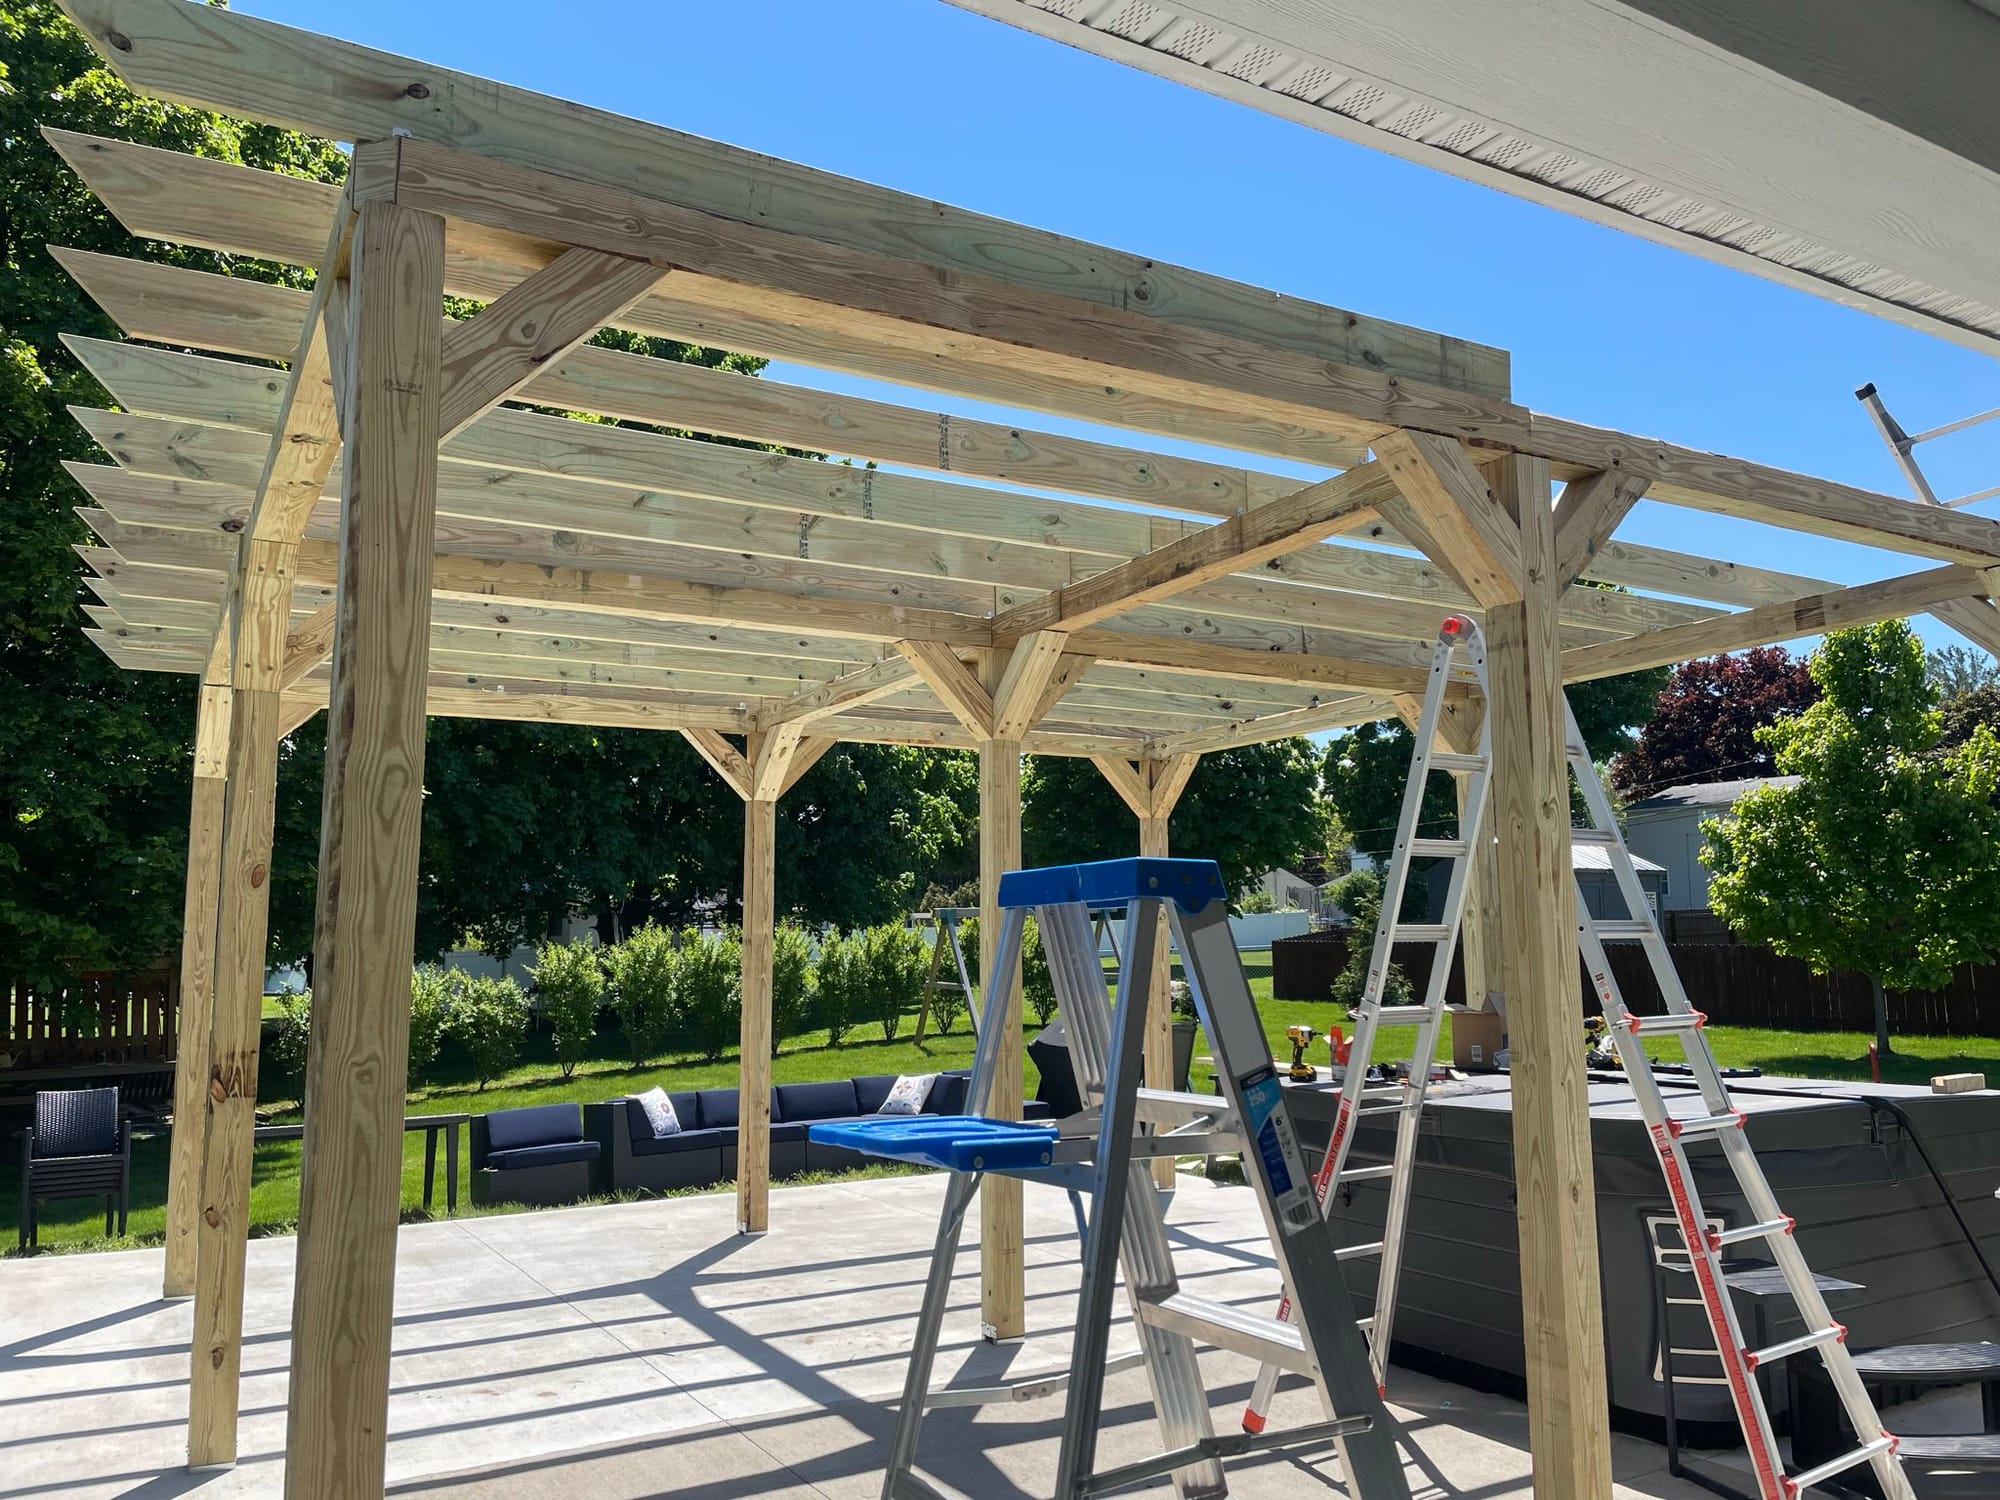
Day 3 was when things started to come together. I put in all the knee braces to stabilize the frame. Then Lily helped me install the 2"x8"x12' rafters that run east-and-west across the frame at 2' intervals. To hide the ugly galvanized steel angle brackets and screws, we put all the hardware on top of the lumber so it isn't easily seen from the ground. The rafters were a lot more tiring and tedious than I had expected so that was all we got done on day 3.
Day 4
On day 4, I put on the 2"x4"x12' slats that run north-and-south on top of the rafters at 2' intervals. I connected each slat to the rafters at every intersection using the galvanized steel angle brackets and screws. This added even more stability.
Lily wanted to help but I only had one ladder tall enough to reach that high (the Little Giant) so I did it alone. At this point, I just wanted to be done with this project as quickly as possible, to be honest. It was a lot of work.
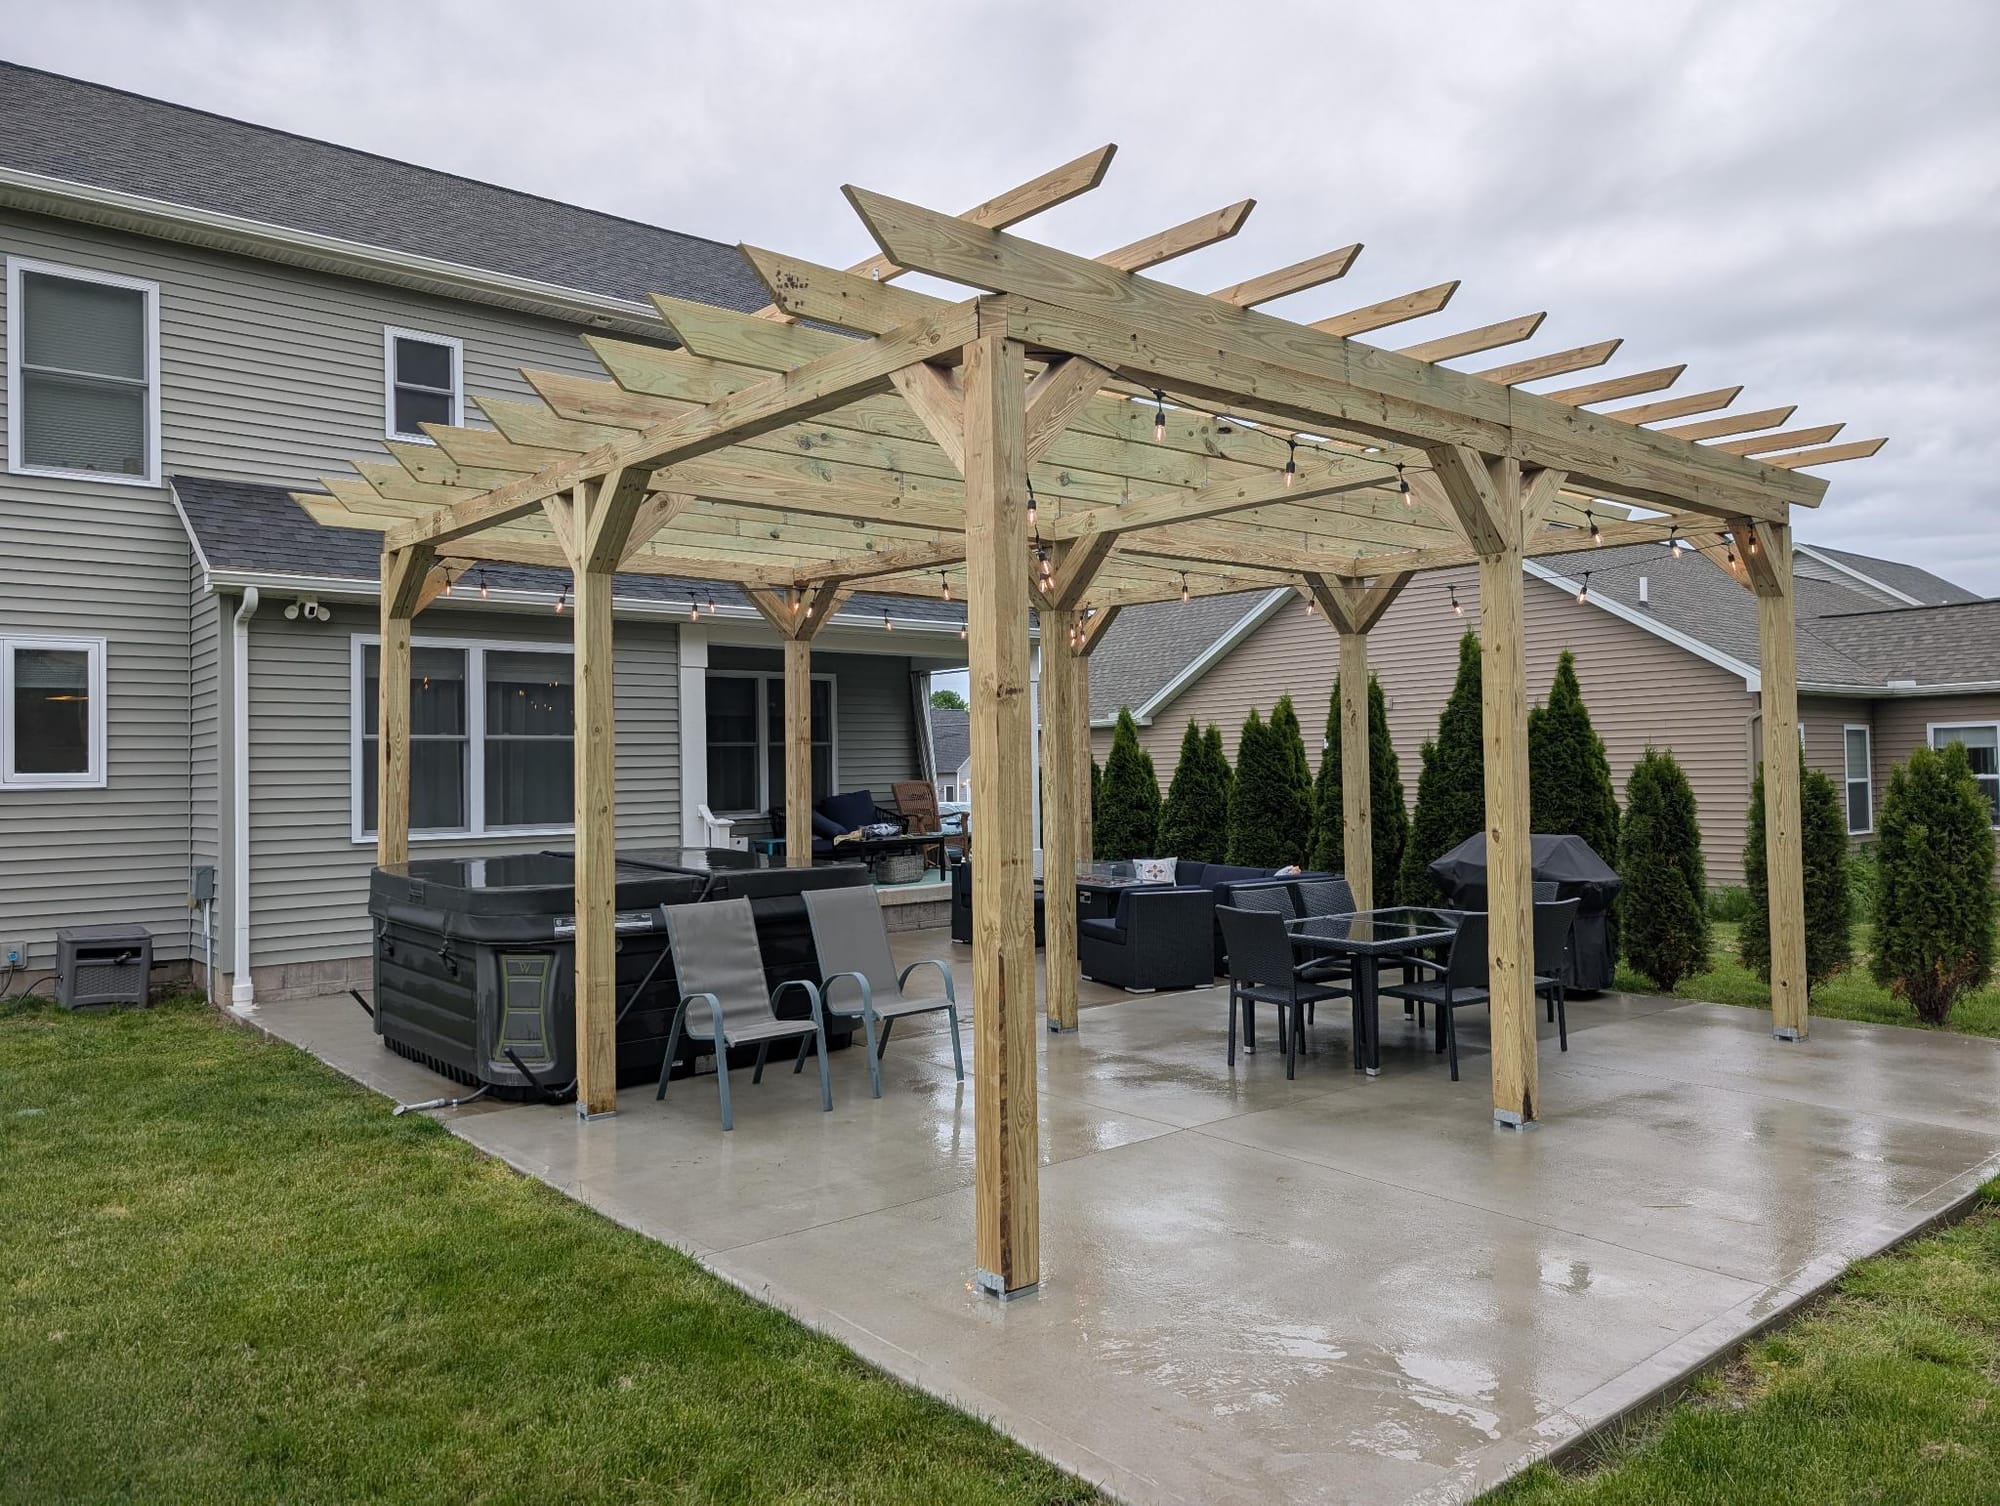
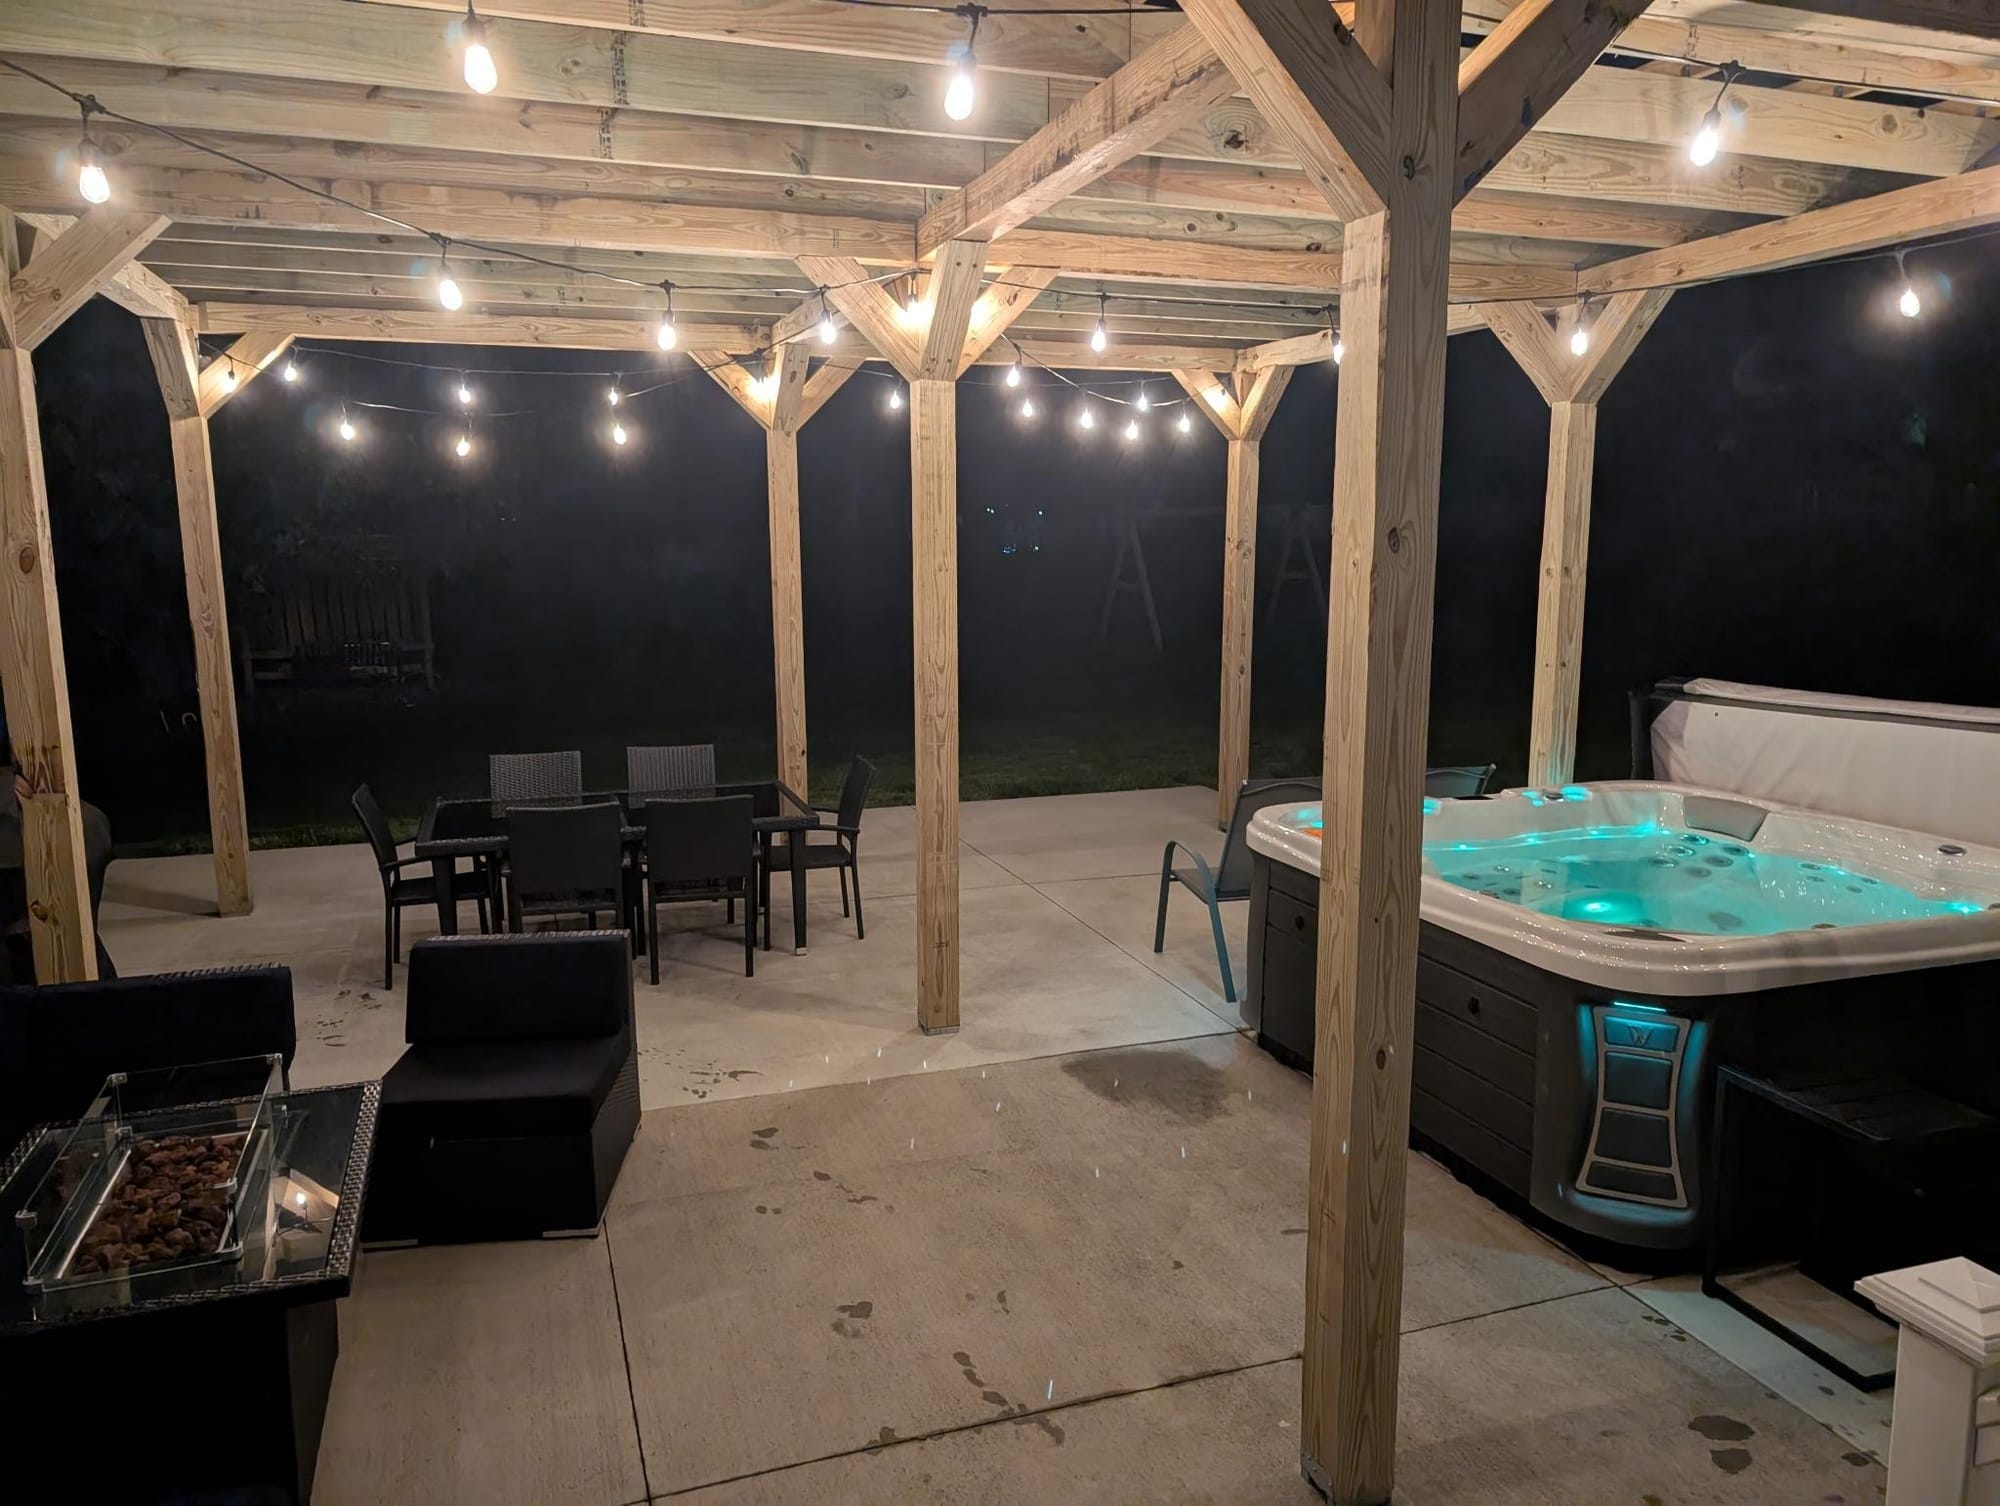
With the slats in place, the structure was pretty much done. I strung up the 96' of LED Edison bulbs and held the cords in place with the cable staples. They are plugged into an extension cord that runs up one of the corner posts, which is plugged into a remote-controlled switch, which is plugged into an outlet under the window on the covered porch.
Finally, I put all the furniture back where it was originally. Crystal will probably want to rearrange things, but I just wanted to get it back into a usable state so we can start enjoying it.
Conclusion
This turned out really well! The little bit of shade during the day is nice. It's way better than the patio umbrellas I used to have out there. They never quite shaded the spots we needed them to and I was constantly worried about them blowing over. But the star of the show is the night-time lighting while sitting in the hot tub. It's a great way to end the day.
Doing it myself wasn't that complicated. The tools were a bit of an investment, but I'm sure I'll use them again soon. And if I had paid someone else to design and build this, it would have easily cost double anyway. You definitely need at least one other strong back to help get the frame assembled, but that's really the only part that requires a second person. The rest is just a little planning and lots of screwing. No really, tons of screws!